
Let's be real, when most people hear "WordPress page speed optimization," their eyes glaze over, imagining a swamp of complex code and techy nonsense. But the core idea is actually dead simple: a fast website makes people happy, and happy people stick around. That's what directly impacts your bottom line.
Every single millisecond counts. A slow site isn't just a minor hiccup—it's a genuine business liability.
Why WordPress Speed Is a Non-Negotiable
It's time to stop thinking of website speed as just a "nice-to-have" feature. In reality, your site’s performance is a hard-nosed business metric with very real consequences. A page that drags its feet doesn't just annoy people; it makes them leave before they ever see that amazing product or insightful blog post you worked so hard on.
This isn't just a hunch I have. It’s a cold, measurable fact. Studies have shown that a delay of just 1 second in page load time can torpedo your conversion rates by 7%. That's a massive hit for any business, big or small.
This direct line between speed and revenue is precisely why search engines like Google are so obsessed with performance.
The connection between how fast your site loads and its impact on your business is undeniable. Even seemingly small delays can have a surprisingly large effect on visitor behavior and, ultimately, your revenue.
The Business Impact of Page Load Time
| Load Time Increase | Impact on Bounce Rate | Impact on Conversions |
|---|---|---|
| 1s to 3s | +32% | -7% |
| 1s to 5s | +90% | -12% |
| 1s to 6s | +106% | -15% |
| 1s to 10s | +123% | -20% |
These numbers paint a clear picture: the longer you make your visitors wait, the more likely they are to leave and never come back. Speed isn't just a technical goal; it's a critical part of the customer journey.
Understanding Google’s Core Web Vitals
To quantify this "user experience," Google developed a set of specific metrics called Core Web Vitals. These aren't just abstract numbers for developers to chase; they're designed to measure how a real person actually perceives your site's speed and stability. Getting a handle on these is the first real step in any smart optimization plan.
Here’s what they actually mean in plain English:
- Largest Contentful Paint (LCP): This is all about perceived load speed. It measures how long it takes for the biggest thing on the screen—like a hero image or a big block of text—to show up. A good LCP score reassures your visitor that, yes, the page is actually loading.
- Interaction to Next Paint (INP): This one measures responsiveness. It’s the time between a user's click or tap and when they see something happen on the screen. A low INP is what makes a site feel snappy and alive, not sluggish and broken.
- Cumulative Layout Shift (CLS): You know that infuriating moment when you go to click a button, and an ad loads above it, pushing the button down at the last second? That’s layout shift. CLS measures how much your page elements jump around unexpectedly, which is a major source of user frustration.
A poor score in any of these areas tells Google your site provides a clunky experience, which can ding your search rankings. More importantly, it just flat-out frustrates the people you're trying to turn into customers.
The Foundation of a Fast Website
Before you even think about installing a single plugin or compressing an image, we need to talk about the bedrock of your site's performance: your hosting.
I've seen it a hundred times—people pour hours into optimization, only to be held back by a slow, overcrowded server. It's like trying to win a drag race in a minivan. Your hosting is the single most important foundational decision you'll make for speed. If you're on a shaky foundation, everything else is just a band-aid.
Not sure where to even start looking? Our guide on the best hosting for WordPress can point you in the right direction.
Ultimately, speed isn't just a technical box to check. It's woven into the fabric of your user experience, your brand's reputation, and your overall success. Once you truly get that, you're ready to dive into the specific fixes that will transform your site.
Before you can make your website faster, you have to play detective.
Jumping straight into fixes without knowing the real problem is like trying to fix a car without popping the hood. You might tighten a random bolt, but you'll probably miss the leaky hose that's causing all the trouble. Real, effective WordPress page speed optimization starts with a proper diagnosis.
The goal here isn't just chasing a high score on a testing tool; it's about understanding why your site is dragging its feet. Is it a sluggish server? Giant, unoptimized images? Or maybe it’s a swarm of JavaScript files from a dozen different plugins, all tripping over each other to load first. Tools like Google PageSpeed Insights and GTmetrix are your best friends here, but you need to know how to read what they're telling you.
Interpreting Performance Reports
When you run your first test, you’re going to get hit with a wall of data, scores, and techy-sounding terms. Don't sweat it. Most of these reports are actually designed to point you toward the biggest wins first.
Here’s what a typical report from Google's PageSpeed Insights tool looks like.
This report immediately flags your Core Web Vitals scores and gives you an overall performance grade. Right away, you can see what’s passing and what needs attention. The real gold, though, is in the "Opportunities" section just below. This is your starting to-do list, pointing directly to problems like oversized images or render-blocking resources.
Don't try to fix everything at once. Look for the items with the highest "estimated savings." These are your low-hanging fruit—the fixes that will give you the biggest performance jump for the least amount of effort.
Key Takeaway: Think of a performance report less like a final grade and more like a treasure map. The "opportunities" and "diagnostics" sections are X's on that map, pointing you straight to the biggest performance treasures you can find.
Demystifying Key Performance Metrics
Beyond the main score, a few specific numbers tell a much deeper story about what your visitors are actually experiencing. Getting a handle on these helps you prioritize your fixes like a pro.
-
Time to First Byte (TTFB): This is all about how long it takes your server to even start sending back the first piece of data. If your TTFB is high (think over 600ms), it’s often a sign of slow hosting, a bloated database, or clunky server-side code. It's the first clue that your website's foundation might be a bit shaky.
-
Total Blocking Time (TBT): TBT tracks the total time your page is blocked and can't respond to user input—like clicks or typing—because it's busy with long-running scripts. A high TBT is a classic symptom of too much JavaScript trying to run during the initial page load, which is what makes a site feel jerky and unresponsive.
Reading a Waterfall Chart
For a truly deep dive, nothing beats a waterfall chart. You can find these in tools like GTmetrix or right inside your browser's developer tools. A waterfall chart visualizes every single file your site loads—from CSS and JavaScript to images and fonts—and shows you exactly how long each one takes.
It breaks down the loading process for every single asset into distinct phases:
| Phase | What It Means | What to Look For |
|---|---|---|
| DNS Lookup | The time it takes to find your server's address. | Long bars here might point to DNS issues. |
| Connecting | Establishing a connection with the server. | Can be slow if your network or server setup is poor. |
| Waiting (TTFB) | Waiting for the server's first byte of response. | A long purple bar is a dead giveaway for a slow server. |
| Receiving | Downloading the actual file content. | Long green bars mean the file itself is huge. |
By just scanning this chart, you can spot the culprits almost instantly. See a long purple "Waiting" bar for your main HTML document? That screams "slow hosting." A bunch of long green "Receiving" bars for your JPEGs? Your images are way too big. Multiple JavaScript files loading one after another, blocking everything else? You've just found a classic render-blocking problem.
This level of detail takes you from guessing to knowing. You can build a targeted optimization plan based on solid evidence, making sure your time and effort are spent where they'll make a real difference for your WordPress site's speed.
Securing Foundational Speed Wins
Not all optimizations are created equal. I've seen it time and time again: people spend weeks tweaking tiny settings, feeling productive, but their site is still sluggish. Why? Because they missed the big stuff.
Getting a few foundational pieces right from the start is like building your house on solid bedrock instead of sand. Everything you build on top of it will be stronger and more stable. These are the major wins that truly set the stage for a fast website.
Select a High-Performance WordPress Host
Let me be blunt: your web host is the single most important factor for your site's speed. It's the engine. You can have the most aerodynamic car in the world, but if it's got a lawnmower engine, you're not winning any races.
I've consulted on countless projects where the owner was chasing minor plugin optimizations for months, only to realize their cheap, slow shared hosting plan was the real bottleneck all along. On a shared host, you're crammed into a server with dozens, sometimes hundreds, of other websites. If one of their sites gets a traffic spike, your site pays the price. You have no control.
Investing in quality managed WordPress hosting is a total game-changer. These providers build server environments specifically for WordPress, and they often include things like:
- Server-level caching that blows plugin-based solutions out of the water.
- The latest hardware, like NVMe SSDs, and top-tier network infrastructure.
- Dedicated resources, so you're not affected by "noisy neighbors."
A good host can single-handedly slash your Time to First Byte (TTFB) and give you a rock-solid foundation for everything else you do.
Pro Tip: When you're picking a host, look past the price. Seriously. Check for features like NVMe storage, built-in server caching, a free CDN, and good reviews on both performance and support. It’s an investment that pays for itself in a better user experience and fewer headaches.
Use a Lightweight and Optimized Theme
Right after hosting, your theme is the next domino to fall. A beautiful theme that comes loaded with dozens of scripts, massive stylesheets, and every feature under the sun might look amazing in the demo, but it will absolutely cripple your site's load time.
Many of those "multipurpose" themes are notorious for this. They pack in every conceivable feature to appeal to everyone, but this leads to massive "code bloat." Your site is forced to load tons of resources it doesn't even use on a given page.
When you're choosing a theme, think performance first. Look for themes marketed as "fast," "lightweight," or "performance-optimized." Often, the sweet spot is pairing a minimal theme with a quality page builder like Elementor. This gives you incredible design flexibility without all the unnecessary baggage.
Always Use the Latest PHP Version
PHP is the programming language that makes WordPress tick. Every new version brings major performance and security boosts. Running an old version of PHP is like using a ten-year-old operating system on your computer—it’s just going to be slower and way more vulnerable.
For example, just upgrading from PHP 7.4 to a version of PHP 8 can result in a notable increase in how many requests your server can handle per second. That’s a free, server-side speed boost that costs you nothing.
Any decent web host will make it simple to switch your PHP version right from your control panel. If your host doesn't support recent PHP versions (8.0 or higher), that's a massive red flag. It’s time to find a new provider.
Keep Everything Updated
This one sounds almost too obvious, but you'd be surprised how many people let it slide. Keeping your WordPress core, plugins, and theme updated is completely non-negotiable for a healthy site.
Developers don't just push out updates for shiny new features; they're constantly shipping crucial performance enhancements and security patches. An outdated plugin isn't just potentially slow—it could have a conflict with a newer version of WordPress that grinds your entire site to a halt.
For a deeper dive into how all these pieces fit together, check out our comprehensive guide on WordPress page speed optimization, which walks through the whole process. Make updating a regular routine, and you'll ensure your site is always running on the most efficient and secure code available.
Advanced Caching and Asset Management

Alright, with a solid performance foundation in place, it’s time to get into the optimizations that separate a merely fast site from a genuinely lightning-fast one. This is where we roll up our sleeves and dig into caching and asset management—two absolute pillars of WordPress page speed optimization.
I like to think of caching like a restaurant's prep station. Instead of cooking every single dish from scratch the moment an order comes in, the kitchen preps popular ingredients and even entire meals ahead of time. When a customer orders, the food is served almost instantly. Your website can do the exact same thing with its content.
The Different Layers of Caching
Here’s something a lot of people miss: caching isn't just one thing. It's a multi-layered strategy, and getting how these layers work together is the key to unlocking serious speed gains. Each type tackles a different bottleneck in the loading process.
These are the main types you'll run into:
-
Browser Caching: This one happens on your visitor's computer. When they visit your site, their browser saves static files like your logo, CSS stylesheets, and JavaScript. On their next visit, the browser just grabs those files from its local storage instead of downloading them all over again. This makes return visits feel instantaneous.
-
Page Caching: For most WordPress sites, this is the heavy hitter. By default, WordPress builds every page dynamically—it runs PHP code and queries the database. Page caching takes a snapshot of the finished page (a static HTML file) and serves that instead. It completely bypasses all that slow back-end processing.
-
Object Caching: This is a more advanced, server-side technique. It stores the results of common database queries in memory. If you're running a complex site, especially with e-commerce or membership functionality, this can dramatically reduce the strain on your database.
Page caching is your biggest weapon. By serving a pre-built HTML file, you cut down the server's workload dramatically, which is essential for reducing your Time to First Byte (TTFB) and delivering content to the user faster.
Putting Caching into Practice
For most of us, the best way to implement these strategies is with a dedicated plugin. Tools like WP Rocket, W3 Total Cache, and Nitropack are fantastic at creating those static HTML snapshots of your pages, sidestepping WordPress’s default dynamic PHP processing.
In my experience, just installing and configuring a plugin like WP Rocket can automatically implement 80% of web performance best practices right out of the box.
Strategic Asset Optimization
Beyond just caching, the next frontier is managing your assets—specifically, your CSS and JavaScript files. Every single plugin and theme you add brings its own code, and over time, this can lead to some serious bloat. The goal is to shrink these files and stop them from blocking the page from rendering.
Two key techniques here are:
-
Minification: This process is like a digital spring clean. It strips out all the unnecessary characters from your code files, like whitespace, comments, and line breaks. The code still works perfectly, but the file size is smaller, which means it downloads faster.
-
Deferring and Delaying JavaScript: By default, when a browser hits a
<script>tag, it stops everything else to download and run it. We call this "render-blocking." Deferring a script tells the browser to download it in the background while the page loads and only run it after the main content is visible. This simple change can make a huge difference in perceived load time.
A Real-World Asset Management Scenario
Let's say you have a slick contact form plugin, but you only actually use it on your "Contact Us" page. Without smart asset management, that plugin is probably loading its CSS and JavaScript on every single page of your site—slowing down your homepage, your blog posts, everything.
This is where a good performance plugin with asset management becomes a lifesaver. These tools let you see all the scripts loading on a page and selectively disable the ones that aren't needed.
Example In Action:
| Page | Contact Form Plugin | Status | Outcome |
|---|---|---|---|
| Homepage | Not used here | Disabled | Faster load time, reduced requests |
| About Page | Not used here | Disabled | Faster load time, reduced requests |
| Contact Us | Used here | Enabled | Plugin functions correctly where needed |
Taking this granular approach trims the fat from each page load by preventing unnecessary code from ever being downloaded. It’s absolutely crucial for sites built with page builders like Elementor, which often have dozens of widgets loading their own assets.
Properly managing these files can be a total game-changer, and our guide on how to speed up Elementor dives even deeper into specific tips for this. This level of control ensures your visitors only download what's essential for the page they're actually viewing, creating a much leaner and faster experience across your entire site.
Mastering Image and Media Optimization
Images and videos are often the biggest culprits behind a slow website. I’ve seen them single-handedly turn a zippy, responsive page into a sluggish, frustrating experience. But here's the thing: they don't have to. With a bit of know-how, you can pack your site with rich visuals without making your visitors drum their fingers on the desk.
At its core, smart media handling is a cornerstone of any good WordPress page speed optimization strategy. It all comes down to serving the right file, at the right size, and at the right time. If you can get those three things dialed in, you’re already way ahead of most websites out there.
First Things First: Choose the Right Image Format
Before you even think about hitting that "upload" button, your first decision is picking the correct file format. This simple choice can slash your file sizes without any noticeable drop in quality. It’s all about using the right tool for the job.
I often see people using PNGs for everything, and it’s a classic performance mistake. Each format has its strengths, and knowing when to use each one is a foundational skill.
To make it simple, I've put together a quick guide to help you choose.
Image Format Selection Guide
This table breaks down the most common web formats so you can make a quick, informed decision every time.
| Format | Best For | Key Feature |
|---|---|---|
| JPEG | Photos, complex images with many colors. | Great compression for a balance of size & quality. |
| PNG | Logos, icons, graphics requiring transparency. | Lossless quality, but creates large photo files. |
| WebP | A modern replacement for both JPEG and PNG. | Superior compression; files are 25-35% smaller. |
Getting the format right from the start is the lowest-hanging fruit in image optimization. It prevents you from having to go back and fix clunky, oversized images later on and sets you up for a faster, more visually appealing page from day one.
The Three Pillars of Image Optimization
Once you've picked the format, the real optimization work begins. It boils down to three core principles. If you can master these, you’ll see a dramatic drop in your page weight.
First up is smart compression. This process intelligently shrinks file size by removing unnecessary data. You have two main options: lossless, which keeps quality perfect but offers smaller savings, and lossy, which can slightly reduce quality for huge file size reductions. Honestly, for almost all web use cases, a gentle lossy compression gives you the biggest bang for your buck.
Next is correct resizing. This one seems obvious, but it’s a mistake I see all the time. Never upload an image that is physically larger than it will ever be displayed. If your blog's main content area is only 800 pixels wide, uploading a 4000-pixel-wide photo is just wasting bandwidth. Resize it before you upload it.
Finally, you need to implement lazy loading. This is a total game-changer, especially for long pages with lots of media. Lazy loading tells the browser to hold off on loading images or videos until they're about to scroll into view. Instead of forcing the visitor to download everything at once, the page loads just the essentials first, making the initial experience feel incredibly fast.
Don’t underestimate the power of these steps. Images often make up around 60% of a WordPress page’s total size. Getting this right can boost your loading speed by an estimated 30%. You can dig into more data-backed insights on how images impact WordPress performance at magecomp.com.
Don’t Forget About Video Embeds
Embedded videos, especially from platforms like YouTube or Vimeo, are another common performance bottleneck. A standard video embed loads a surprising number of scripts and player assets right away, even if the user never clicks play.
The best trick I've found is to replace the heavy video embed with a lightweight preview image. When someone actually clicks the thumbnail, the full video player then loads on demand. Many performance plugins, like WP Rocket, offer this feature with a simple checkbox, effectively stopping that video from slowing down your initial load time.
This infographic really brings home the impact of optimizing all your site’s assets, showing the direct line from smaller files to faster page speed.
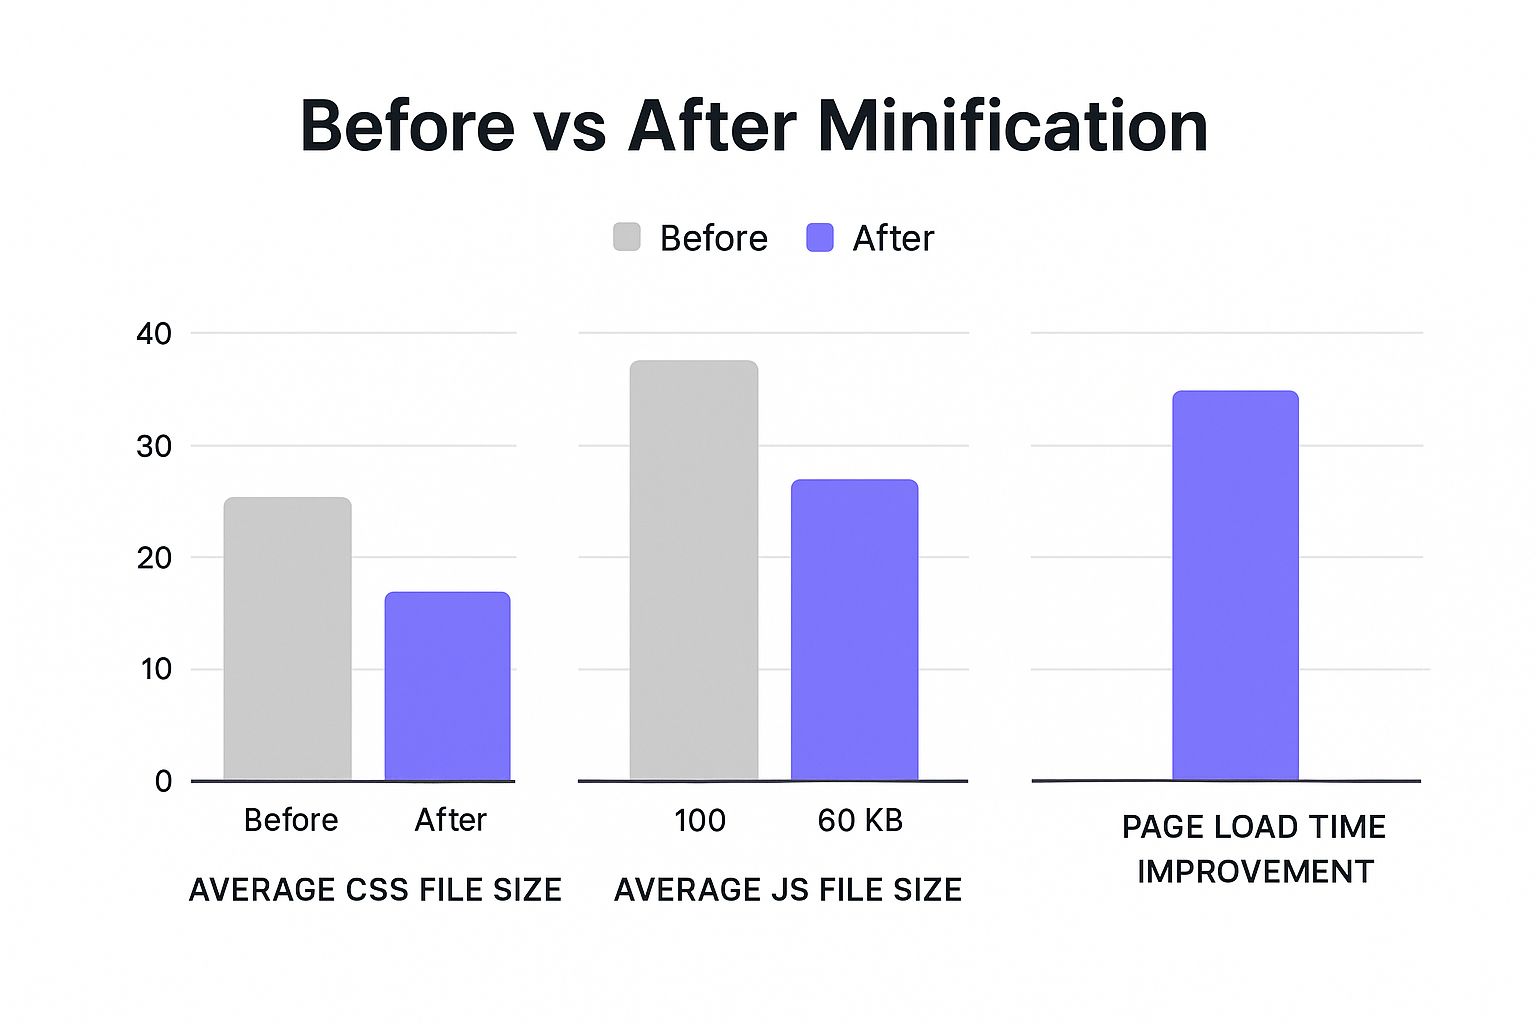
As you can see, actions like minifying CSS and JavaScript lead to much smaller file sizes, which is exactly what we’re trying to achieve for a snappier, more enjoyable user experience.
Alright, you've handled the on-site optimizations—caching, asset cleanup, image compression—but there's one last heavy-hitter to bring in. This step is all about closing the physical distance between your website's server and your visitors, no matter where they are in the world. This is where a Content Delivery Network (CDN) becomes your secret weapon.
A CDN is basically a worldwide network of servers that keeps copies of your site's static files, like images, CSS, and JavaScript. So, when someone from Japan visits your site hosted in Texas, they aren't waiting for those files to travel halfway across the globe. Instead, the CDN serves them from a server much closer, maybe even in Asia.
This simple change drastically slashes latency—the time it takes for data to make that long trip. The impact on your load times can be massive.
Getting a CDN Hooked Up to WordPress
You might be surprised how easy it is to get a CDN working. A lot of top-tier hosting providers actually bundle a CDN with their plans now, and activating it is often as simple as flipping a switch in your hosting panel. If your host doesn't offer one, dedicated services like Cloudflare or RocketCDN are fantastic options with free or affordable plans that play nicely with WordPress.
The setup usually looks something like this:
- You sign up for the CDN service and give them your website's domain.
- They’ll give you new nameservers. You'll update your domain's DNS settings to point to these, routing your traffic through their global network.
- Most good CDNs have a WordPress plugin or crystal-clear instructions to help you fine-tune the settings, like caching rules and other performance tweaks.
Once it's running, the CDN works its magic in the background, making sure your visitors get a speedy experience from anywhere. And this isn't just a minor improvement; the data shows that CDNs can potentially cut loading times by up to 50%. You can dig deeper into how CDNs boost WordPress performance by checking out these stats.
The Final Cleanup and the Big Reveal
With your CDN active and optimizations in place, it's time for one last piece of housekeeping before the grand finale: re-running your speed tests. Over time, your WordPress database gets bogged down with clutter—think old post revisions, trashed comments, and expired temporary data. Running a database optimization plugin can clear out this junk, helping your server respond just that little bit faster.
The best part of any WordPress page speed optimization project is seeing the results. Don't skip this final measurement. It's the proof that all your hard work paid off and gives you that satisfying before-and-after snapshot of your site's transformation.
Now, head back to Google PageSpeed Insights or GTmetrix and run the exact same tests you did when you started. Pull up that old report and compare it to the new one. You should see a world of difference:
- A much higher overall performance score.
- Those Core Web Vitals should be looking healthy and green.
- A quicker Time to First Byte (TTFB).
- A noticeably smaller total page size.
- Fewer HTTP requests, now that your assets are combined.
This final test isn't just for bragging rights. It's concrete, measurable proof of how you've improved the user experience, showing that a lightning-fast website is absolutely within your grasp.
Common WordPress Speed Questions

Even with the best game plan, you're bound to run into questions and a few surprises when you're working on WordPress page speed optimization. I've been there. So, let’s tackle some of the most common questions I hear from people trying to speed up their sites.
How Often Should I Check My Site Speed?
My rule of thumb? Test your site's performance after any major change. That means every time you add a new plugin, switch themes, or make significant content updates.
For regular check-ins, I find a monthly routine works best. A quick run-through with GTmetrix and a look at your Core Web Vitals report in Google Search Console is usually enough. This simple habit helps you spot performance drops before they spiral into bigger headaches.
Will a Page Builder Slow Down My Site?
It’s a fair question. A page builder like Elementor naturally adds some code to your site. But the truth is, modern builders are incredibly well-optimized. The real performance drag doesn't come from the builder itself, but from how you use it.
The key is to build efficiently. Try to avoid overly complex, nested sections and take advantage of any asset management features your tools offer. These let you disable scripts and styles on pages where they aren't needed, ensuring you're only loading what’s absolutely essential.
A friendly reminder: the quality of your plugins is far more important than the quantity. I’ve seen a single, well-coded plugin outperform ten bloated, poorly-made ones. Always, always test your site’s speed before and after installing a new plugin to see its true impact.
When you're smart about it, you can minimize the performance footprint of even the most powerful tools.
Ready to build faster, more flexible websites? Exclusive Addons for Elementor provides a massive library of powerful widgets and extensions, all designed with lightweight code to keep your site blazing-fast. Discover what you can build at https://exclusiveaddons.com.