
In a competitive online space, a slow website is more than an annoyance; it's a direct obstacle to growth. Sluggish load times actively frustrate visitors, leading to higher bounce rates, plummeting conversion opportunities, and significant damage to your SEO rankings. For developers and designers using WordPress and Elementor, the primary challenge is balancing rich, dynamic designs with the non-negotiable need for speed. The flexibility that makes these tools powerful can also, if not managed correctly, introduce performance bottlenecks that hinder user experience.
This guide moves beyond generic advice to provide a definitive list of actionable website performance optimization tips. We will dive deep into specific, high-impact strategies tailored for the WordPress and Elementor ecosystem. You will learn how to implement everything from advanced image compression and critical rendering path optimization to effective database management and CDN integration.
Whether you're a freelance developer, part of a digital agency, or a marketing expert, these techniques are designed to be implemented immediately. By applying these methods, you can systematically transform your site's speed, significantly enhance user satisfaction, and ultimately achieve your core digital objectives. Let's begin building a faster, more effective website.
1. Image Optimization and Compression
Image optimization is a crucial first step in any website performance optimization strategy. It involves reducing the file size of your images through compression, resizing, and using modern formats, all while preserving visual quality. Unoptimized images are often the biggest culprits behind slow page loads, directly impacting user experience and conversion rates.
For WordPress and Elementor users, this is a particularly high-impact area. By focusing on images, you can achieve significant speed improvements with relatively little effort.
Why It Matters
- Faster Page Loads: Smaller image files download faster, drastically reducing the time it takes for your page to become interactive.
- Improved User Experience: Quick-loading pages keep visitors engaged, reducing bounce rates. For instance, Pinterest saw a 40% reduction in image sizes and improved perceived performance using the WebP format.
- SEO Benefits: Page speed is a confirmed ranking factor for Google. Faster sites tend to rank higher in search results.
This infographic highlights the direct performance gains from effective image optimization.
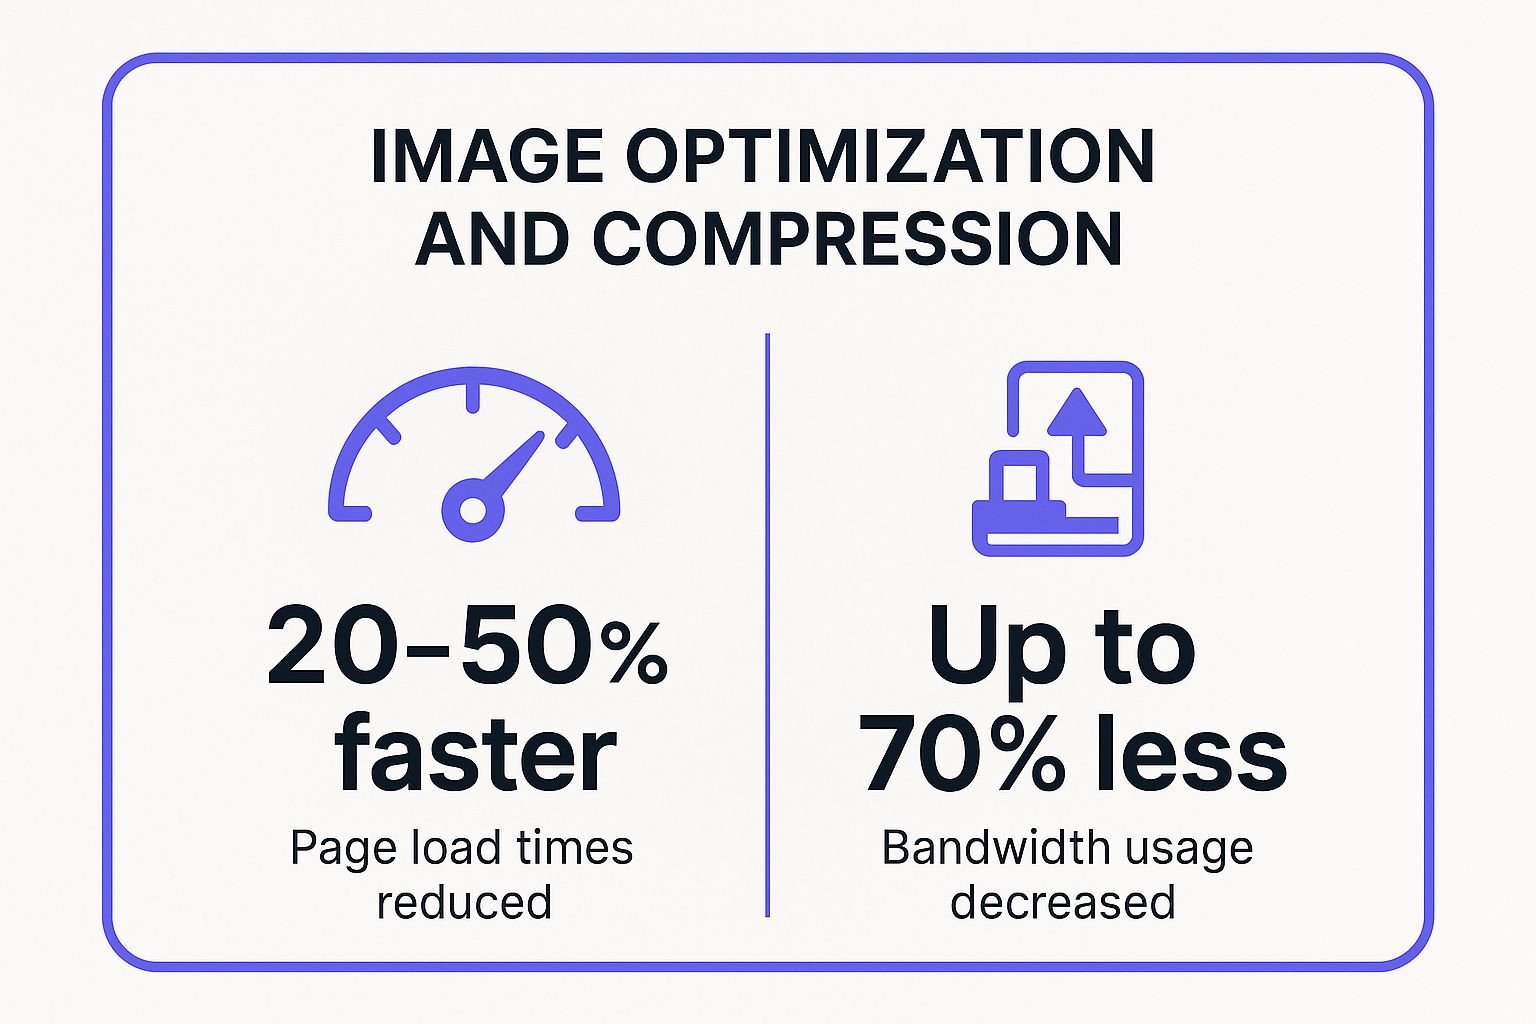
As the data shows, these techniques can cut page load times by up to half and slash bandwidth usage, making your site more accessible and efficient.
Actionable Tips for Elementor Users
- Use Modern Formats: Convert JPEGs and PNGs to WebP. This modern format offers superior compression. Most optimization plugins can automate this and provide a JPEG fallback for older browsers. Learn more about the best image formats for the web on exclusiveaddons.com.
- Automate with Plugins: Use plugins like ShortPixel or Imagify. They automatically compress new uploads and can bulk-optimize your existing media library directly from the WordPress dashboard.
- Enable Lazy Loading: Ensure lazy loading is active. This defers the loading of below-the-fold images until the user scrolls to them. Elementor has a built-in lazy load feature, but many caching and optimization plugins also offer more advanced options.
- Specify Image Dimensions: Always set explicit width and height attributes for your images in Elementor. This prevents Cumulative Layout Shift (CLS), a key Core Web Vitals metric, by reserving the space for the image before it loads.
2. Minification and Compression of CSS/JavaScript
Minification is the process of removing unnecessary characters like whitespace, comments, and line breaks from your CSS and JavaScript files. Compression, using algorithms like Gzip or Brotli, further shrinks these files for faster server-to-browser transmission. Together, these are powerful website performance optimization tips that reduce file sizes and accelerate download times.
For WordPress and Elementor users, this is a core optimization handled by most caching plugins. It directly addresses bloated code files that can slow down rendering and interactivity.
Why It Matters
- Reduced File Sizes: Minification can reduce CSS and JavaScript file sizes by up to 60%. Compression then makes them even smaller, with Brotli often outperforming Gzip by 20%.
- Faster Download and Execution: Smaller files download and are parsed by the browser more quickly, speeding up the critical rendering path.
- Lower Bandwidth Consumption: Less data is transferred, saving bandwidth for both your server and your users, which is especially important for mobile visitors.
This two-pronged approach ensures your site's code is as lean and efficient as possible, directly impacting how fast your pages become usable.
Actionable Tips for Elementor Users
- Use a Caching Plugin: Install and configure a top-tier caching plugin like WP Rocket or LiteSpeed Cache. These tools offer one-click settings to enable CSS and JavaScript minification and combine files.
- Enable Gzip or Brotli: Check if your web host has Gzip or Brotli compression enabled. Most modern hosts enable Gzip by default, but Brotli offers superior compression. You can often enable it via your hosting control panel or by adding rules to your
.htaccessfile. - Combine Files Carefully: While combining CSS or JavaScript files can reduce HTTP requests, it's not always better with modern HTTP/2 and HTTP/3 protocols. Test your site's performance with and without this feature enabled to see what works best for your specific setup.
- Handle Exclusions: Sometimes, minifying or combining a specific script can break your site's functionality. Good optimization plugins allow you to exclude specific CSS or JavaScript files from the process, giving you fine-grained control to resolve conflicts.
3. Content Delivery Network (CDN) Implementation
A Content Delivery Network (CDN) is a core component of modern website performance optimization tips. It is a geographically distributed network of proxy servers that caches your site's static content, such as images, CSS, and JavaScript. When a user visits your site, the CDN delivers this content from a server physically closest to them, dramatically reducing latency.

For websites with a global or widespread national audience, a CDN is non-negotiable. It ensures that users in different regions experience consistently fast load times, as data doesn't have to travel across continents from a single origin server.
Why It Matters
- Reduced Latency: By serving assets from nearby locations, a CDN significantly cuts down the round-trip time for data, leading to faster page loads.
- Improved Reliability and Scalability: CDNs distribute traffic across multiple servers, preventing your origin server from being overwhelmed during traffic spikes and improving uptime. For example, Spotify uses its CDN to deliver music streaming with near-perfect uptime globally.
- Enhanced Security: Many CDNs, like Cloudflare, include built-in protection against DDoS attacks and other security threats, adding a valuable layer of defense.
Actionable Tips for Elementor Users
- Choose a Provider with a Strong Presence: Select a CDN like Cloudflare or StackPath (formerly MaxCDN) that has servers (Points of Presence) in your key target markets for maximum impact.
- Easy Integration with Plugins: Most caching plugins, such as WP Rocket or LiteSpeed Cache, offer seamless, one-click CDN integration. You simply enter your CDN's details, and the plugin automatically rewrites your asset URLs to be served from the CDN.
- Focus on Static Assets First: Start by configuring your CDN to handle static files like images, CSS, and JavaScript. This is the simplest and most effective use case, offloading the majority of your site's bandwidth.
- Configure Cache Policies: Ensure you set appropriate cache headers for different content types. Static assets can have a long cache duration, while more dynamic content may need shorter expiration times or specific cache-invalidation rules.
4. Browser Caching Strategies
Browser caching is one of the most effective website performance optimization tips. It involves instructing a user's browser to store static website resources, like CSS, JavaScript, and images, locally. When a user revisits your site, the browser loads these files from its local cache instead of re-downloading them, leading to dramatically faster load times.
For WordPress and Elementor sites, implementing a smart caching strategy is essential. It reduces server load and bandwidth usage while providing a seamless experience for returning visitors.
Why It Matters
- Instantaneous Repeat Visits: For returning users, pages load almost instantly because most resources are already stored on their device.
- Reduced Server Load: By serving cached files, you decrease the number of requests to your server, which is crucial for sites with high traffic. For example, Wikipedia’s multi-layered caching strategy reduces its server load by over 90%.
- Improved User Metrics: Faster repeat visits lead to higher engagement, more page views, and better conversion rates.
Actionable Tips for Elementor Users
- Leverage Caching Plugins: Use a comprehensive caching plugin like WP Rocket or LiteSpeed Cache. These tools simplify the process by automatically applying the correct browser cache rules (
Expiresheaders) to your.htaccessfile. - Set Long Expiration Times: Configure your caching policy to set long cache lifetimes (e.g., one year) for static assets like images, CSS, and JS files that rarely change. This ensures they remain cached for as long as possible.
- Use Cache-Busting for Updates: When you update CSS or JS files, ensure your optimization plugin uses versioning in the filenames (e.g.,
style.v2.css). This "cache-busting" technique forces browsers to download the new file. - Differentiate Cache Policies: Apply different caching rules for different content types. Static assets can have a long cache duration, while dynamic HTML content should have a shorter one or use validation (ETags) to ensure freshness. To understand the fundamentals, you can learn more about how WordPress caching works on exclusiveaddons.com.
5. Lazy Loading Implementation
Lazy loading is a powerful technique that dramatically improves initial page load times. It works by deferring the loading of non-critical resources, like images and videos, until they are about to enter the user's viewport. Instead of loading everything at once, your site loads only what's immediately visible, saving bandwidth and delivering a faster initial experience.
For WordPress and Elementor users, implementing lazy loading is one of the most effective website performance optimization tips. It directly addresses Core Web Vitals by reducing the initial page payload and speeding up the Largest Contentful Paint (LCP).
Why It Matters
- Faster Initial Load: By not loading below-the-fold content, the browser can render the visible part of the page much faster.
- Bandwidth Conservation: Users on mobile or slow connections save data because they only download the assets they actually view. For example, YouTube lazy loads video thumbnails, saving immense bandwidth on its homepage.
- Improved Resource Allocation: The browser can prioritize rendering critical, above-the-fold content without being blocked by assets the user may never see.
This video from Google Chrome Developers explains the impact and implementation of lazy loading in detail.
As demonstrated, this simple change ensures the initial page view is ready almost instantly, a key factor in user retention.
Actionable Tips for Elementor Users
- Use Native Lazy Loading: WordPress automatically adds
loading="lazy"to images. Ensure this feature is active. Elementor also has its own lazy load settings you can configure under Elementor > Settings > Features. - Lazy Load Videos and iFrames: Don't stop at images. Embedded videos, especially from YouTube, can be heavy. Use the "Lazy Load" option in Elementor's Video widget to replace the heavy player with a lightweight facade image.
- Optimize Placeholders: When lazy loading, use placeholders that match the final image's aspect ratio. This prevents content from jumping around as images load, which improves your Cumulative Layout Shift (CLS) score.
- Exclude Above-the-Fold Images: Avoid lazy loading your main hero image or logo. These assets should load immediately for a good user experience. Most optimization plugins, like Perfmatters, allow you to easily exclude specific images from being lazy-loaded.
6. Database Query Optimization
Database query optimization is the process of improving the speed and efficiency of how your website retrieves information from its database. For WordPress sites, which are database-driven, this means refining how data like posts, user info, and plugin settings are accessed. Inefficient queries can create bottlenecks, leading to slow backend operations and prolonged page load times.
Optimizing your database is a powerful, though more technical, website performance optimization tip. It directly reduces server processing time and makes your site feel much more responsive, especially for dynamic, content-heavy platforms.
Why It Matters
- Reduced Server Load: Efficient queries use fewer server resources like CPU and memory, allowing your server to handle more traffic without slowing down.
- Faster TTFB: Time to First Byte (TTFB) is heavily influenced by how quickly the server can process a request. Optimized queries deliver data faster, improving this key metric.
- Enhanced Scalability: A well-optimized database can support a growing amount of content and user traffic without performance degradation, crucial for sites built to scale.
Actionable Tips for Elementor Users
- Add Database Indexes: Indexes help your database find data much faster, similar to an index in a book. Ensure that frequently queried columns, like
post_idormeta_keyin thewp_postmetatable, are properly indexed. - Clean Your Database: Use a plugin like WP-Optimize or Advanced Database Cleaner to remove unnecessary data. This includes old post revisions, trashed comments, and expired transients, which bloat tables and slow down queries.
- Analyze Slow Queries: If you suspect a slow query, use a tool like Query Monitor. This plugin helps you identify specific queries that are taking too long, often pointing to a problematic plugin or theme function.
- Limit Post Revisions: WordPress stores every saved draft of your posts, which can quickly clutter the
wp_poststable. Limit the number of revisions by addingdefine('WP_POST_REVISIONS', 3);to yourwp-config.phpfile.
7. Critical Rendering Path Optimization
Critical rendering path optimization is an advanced technique that prioritizes how browsers load and display above-the-fold content. It involves controlling the sequence of CSS and JavaScript loading to ensure the most important, visible part of the page renders first, creating a faster perceived load time for the user.
For WordPress and Elementor sites, which often have many CSS and JavaScript files, optimizing this path is a powerful website performance optimization tip. By managing render-blocking resources, you can make your site feel instantly responsive.
Why It Matters
- Faster Perceived Performance: Users see content sooner, which significantly improves their experience and reduces the chance they will leave. The Guardian, for example, achieved 1.2-second faster rendering by inlining its critical CSS.
- Improved Core Web Vitals: This directly impacts metrics like First Contentful Paint (FCP) and Largest Contentful Paint (LCP) by ensuring visual content is not delayed by non-essential scripts or styles.
- Better Engagement: A site that appears to load instantly keeps users engaged and focused. Airbnb famously optimized its critical path, reducing its time to first paint by an impressive 5 seconds.
Actionable Tips for Elementor Users
- Identify and Inline Critical CSS: Use a tool like the free Critical Path CSS Generator to extract the CSS needed for your above-the-fold content. Many optimization plugins, such as WP Rocket or Perfmatters, can automate this process for you.
- Defer Non-Critical CSS and JS: Load non-essential CSS and JavaScript files asynchronously. This prevents them from blocking the initial render. Elementor's Experiments section offers features to optimize asset loading, and plugins provide more granular control.
- Delay or Defer JavaScript: Use your optimization plugin's settings to delay the execution of non-essential JavaScript, like tracking scripts or social media widgets, until there is user interaction (e.g., a scroll or click).
- Minimize Critical Resources: Reduce the number of fonts, scripts, and stylesheets that are considered "critical." For instance, limit the number of unique font families used above the fold to streamline the initial render.
8. Code Splitting and Bundle Optimization
Code splitting is an advanced website performance optimization technique that breaks down large JavaScript files, or "bundles," into smaller, more manageable chunks. Instead of forcing a user's browser to download all the site's JavaScript at once, code splitting allows for loading these chunks on demand, only when they are needed for a specific page or user interaction.
This method, popularized by tools like Webpack and modern JavaScript frameworks, significantly reduces the initial payload. For complex WordPress and Elementor sites with heavy plugin scripts, this can be a game-changer. It directly tackles the "render-blocking resources" warning often seen in page speed reports.
Why It Matters
- Reduced Initial Load Time: Users download only the essential code for the initial view, making the site feel faster. GitLab famously used dynamic imports to slash their initial JavaScript from 1.2MB to just 400KB.
- Improved Resource Efficiency: It prevents wasting bandwidth and processing power on loading scripts that a user may never need.
- Better Core Web Vitals: By reducing the main thread work during the initial load, it improves metrics like First Input Delay (FID) and Total Blocking Time (TBT).
Actionable Tips for Elementor Users
- Start with Route-Based Splitting: If you are building a more complex site or a single-page application (SPA) within WordPress, splitting your code based on pages or routes is the most effective first step.
- Implement Dynamic Imports: For components that are not immediately visible, like a modal window or a complex contact form that appears on a button click, use dynamic
import()syntax. This tells the browser to only fetch that component's code when the user triggers the action. - Analyze Your Bundles: Use a tool like
webpack-bundle-analyzerto visually inspect what is inside your JavaScript bundles. This helps you identify large libraries or duplicate code that can be optimized or split out. - Leverage Optimization Plugins: While manual code splitting requires development expertise, some performance plugins like Perfmatters or FlyingPress offer features to delay or defer non-critical JavaScript, which simulates a form of code splitting without needing to edit code directly. This is a great starting point for many Elementor users.
9. Server Response Time Optimization
Server response time optimization focuses on reducing the Time to First Byte (TTFB), which is the time it takes for a user's browser to receive the first byte of data from your server. This initial delay is critical, as a slow server response creates a bottleneck that affects every other aspect of your page load.
For WordPress and Elementor users, a long TTFB often points to issues with hosting, inefficient database queries, or unoptimized server configurations. Addressing these are key website performance optimization tips that can lead to dramatic speed improvements.
Why It Matters
- Faster Perceived Performance: A quick TTFB means the browser starts rendering the page sooner, making the site feel more responsive to the user.
- Core Web Vitals Impact: TTFB is a foundational metric that directly influences other Core Web Vitals like Largest Contentful Paint (LCP).
- Improved Conversion Rates: Faster server responses are directly linked to better user engagement. For example, Amazon found that every 100ms improvement in server response time led to a 1% increase in revenue.
Actionable Tips for Elementor Users
- Implement Server-Side Caching: Use tools like Redis or Memcached to store frequently accessed data in memory. Many premium hosting providers offer this, and plugins like W3 Total Cache can help integrate it.
- Optimize Database Queries: A bloated or inefficient database slows down every page request. Use a plugin like WP-Optimize to clean up your database by removing post revisions, spam comments, and transients.
- Choose High-Performance Hosting: Your hosting plan is the foundation of your site's speed. Upgrading from shared hosting to a managed WordPress host or a VPS can dramatically reduce your TTFB.
- Use a Content Delivery Network (CDN): A CDN like Cloudflare or BunnyCDN caches your site's content on servers around the world. This ensures that the initial request is handled by a server geographically closer to the user, significantly lowering TTFB. Learn more about how these elements contribute to WordPress speed optimization on exclusiveaddons.com.
10. HTTP/2 and HTTP/3 Implementation
Upgrading your site's communication protocol is a powerful, server-level website performance optimization tip that can yield massive speed gains. HTTP/2 and its successor, HTTP/3, are modern protocols designed to overcome the limitations of the older HTTP/1.1. They introduce features like multiplexing, which allows multiple requests and responses to be sent at the same time over a single connection.
For WordPress and Elementor sites, especially those with many assets like scripts, styles, and images, this upgrade significantly reduces request overhead and accelerates content delivery.
Why It Matters
- Faster Resource Loading: Multiplexing eliminates the "head-of-line blocking" problem from HTTP/1.1, where a slow request would hold up all others.
- Reduced Latency: Header compression reduces the amount of data sent with each request, while a single connection per origin lowers the time spent on handshakes.
- Improved Mobile Performance: These protocols are especially effective on high-latency mobile networks. Cloudflare has noted significant performance improvements for mobile users after enabling HTTP/3.
The move to these newer protocols is a foundational shift. Major browsers like Chrome and Firefox have reported performance improvements of up to 40% after adopting HTTP/2, showcasing its impact on user experience.
Actionable Tips for Elementor Users
- Choose a Modern Host: The easiest way to get HTTP/2 and HTTP/3 is to use a hosting provider that enables them by default. Most reputable managed WordPress hosts, like Kinsta or Cloudways, have this enabled.
- Use a CDN: A Content Delivery Network (CDN) like Cloudflare can enable HTTP/2 and HTTP/3 for your website with a simple toggle in their dashboard, even if your origin server doesn't support it.
- Verify with Browser Tools: You can check which protocol your site is using. Open Chrome DevTools, go to the "Network" tab, and look at the "Protocol" column. It should show
h2(for HTTP/2) orh3(for HTTP/3). - Rethink Old "Hacks": Practices like domain sharding (splitting assets across multiple subdomains) were workarounds for HTTP/1.1 limitations. With HTTP/2, this is counterproductive and should be avoided.
Website Performance Optimization Strategies Comparison
| Optimization Technique | Implementation Complexity 🔄 | Resource Requirements ⚡ | Expected Outcomes 📊 | Ideal Use Cases 💡 | Key Advantages ⭐ |
|---|---|---|---|---|---|
| Image Optimization and Compression | Medium – setup workflow and format handling | Moderate – CPU for compression | 20-50% faster load times, up to 70% bandwidth reduction | Image-heavy sites, mobile optimization | Significant speedup, reduced bandwidth, SEO boost |
| Minification and Compression of CSS/JS | Low-Medium – automated tools integration | Low – build process and server CPU | 20-40% file size reduction, up to 70% with compression | Web apps, sites with large CSS/JS files | Faster downloads, improved TTI, easy tooling |
| Content Delivery Network (CDN) | Medium – setup and config | Moderate – third-party service cost | 50-80% load time reduction, better reliability | Global audiences, high traffic sites | Low latency, scalability, improved security |
| Browser Caching Strategies | Medium – cache rules, versioning | Low – config and monitoring | 80-95% faster repeat visits, 60-80% fewer server requests | Repeat visitors, improving revisit performance | Drastically faster repeat loads, reduced server load |
| Lazy Loading Implementation | Low-Medium – coding with Intersection Observer | Low – minor JS overhead | 25-50% better initial load times, 30-60% bandwidth savings | Long pages, media-heavy content | Faster initial loads, bandwidth savings |
| Database Query Optimization | High – requires DB expertise | Medium – database tuning | 10-100× faster response times | Data-heavy sites, complex queries | Dramatically faster loading, reduced resource use |
| Critical Rendering Path Optimization | Medium-High – CSS/JS prioritization | Low-Moderate – dev time | 1-3s faster First Contentful Paint, 10-20% conversion boost | Above-the-fold content optimization | Faster visual rendering, better user engagement |
| Code Splitting and Bundle Optimization | Medium-High – build config and chunking | Moderate – build time and tooling | 50-80% smaller initial bundles, 2-5s better TTI | SPAs, heavy JS applications | Faster load, efficient caching, improved interactivity |
| Server Response Time Optimization | High – server tuning and monitoring | Moderate-High – hardware/software | TTFB under 200ms, 20-40% better overall performance | Backend-heavy sites, high traffic | Faster server responses, better SEO and UX |
| HTTP/2 and HTTP/3 Implementation | Medium – server config and SSL setup | Low-Moderate – HTTPS certificate | 10-40% load time improvement, better over high latency | Sites with many resources, mobile users | Multiplexing, reduced overhead, enhanced security |
Unlocking Your Site's Full Potential
Navigating the landscape of website performance optimization can feel like a complex, never-ending task. However, as we've explored, transforming your Elementor site from sluggish to lightning-fast is an achievable goal built on a series of deliberate, strategic actions. This isn't just about tweaking settings; it's about adopting a performance-first mindset that prioritizes user experience at every stage of development and maintenance. The journey from a basic site to a high-performance digital asset is paved with the actionable strategies we've covered.
Key Takeaways for Lasting Impact
The most crucial lesson from these website performance optimization tips is that there is no single magic bullet. Instead, true performance gains come from a holistic approach. It’s the synergy between optimizing your visual assets, streamlining your code, and leveraging powerful server-side technologies that creates a truly remarkable user experience.
Remember the core principles:
- Reduce Payload: Every byte counts. Aggressive image optimization, minification of CSS and JavaScript, and smart code splitting are foundational.
- Shorten the Distance: A well-configured CDN is non-negotiable for a global audience. It brings your content closer to the user, dramatically cutting down latency.
- Work Smarter, Not Harder: Techniques like browser caching, lazy loading, and optimizing the critical rendering path ensure the browser does the least amount of work necessary to display your page quickly.
- Strengthen Your Foundation: A responsive server, an optimized database, and modern protocols like HTTP/3 are the bedrock upon which a fast website is built.
Your Actionable Next Steps
Mastering these concepts transforms you from a website builder into a strategic digital architect. The value extends far beyond a good PageSpeed score. It directly impacts your SEO rankings, user engagement, conversion rates, and overall brand perception. A fast, reliable website is a signal of professionalism and a commitment to your audience.
So, where do you begin? Don't feel overwhelmed. Start by establishing a baseline. Run your site through tools like Google PageSpeed Insights or GTmetrix to identify your biggest bottlenecks. From there, pick one or two high-impact areas from this list to tackle first. Perhaps it’s implementing a CDN or finally compressing that image library.
Commit to making performance a continuous process of measurement, implementation, and refinement. By consistently applying these website performance optimization tips, you are not just fixing a slow site; you are building a competitive advantage, fostering user loyalty, and unlocking your website’s true potential to achieve its business goals.
Ready to build a high-performance website without sacrificing design freedom? Exclusive Addons is built with a modular architecture and clean, lightweight code, ensuring you only load the assets you need. Start creating faster, more efficient Elementor sites today with Exclusive Addons.