
Static backgrounds feel like a relic of a bygone internet era, don't they? In a world where user attention is everything, a plain, lifeless backdrop just doesn’t cut it anymore. That's why thoughtfully designed animated backgrounds have become more than just a passing trend—they're a powerful way to build an immersive and unforgettable brand experience.
When I talk about animation, I'm not talking about flashy, over-the-top effects that scream for attention. It's the subtle, purposeful motion that truly makes a difference. Think of a soft, flowing particle effect that gently guides the eye toward a "Get Started" button, or a gentle wave animation that encourages you to scroll down the page. These small, elegant details can turn a website from a static document into a living, breathing digital space.
Tell Your Brand Story Visually
Your website’s background is a massive canvas. Why waste it on a solid color? Animation lets you tell a much richer brand story. A tech startup could use an abstract plexus network to feel innovative and futuristic. An eco-friendly brand might feature a slow-motion video of a lush forest to create a sense of calm and nature.
These visual cues connect with users on an emotional level, reinforcing your brand’s identity in a way text or static images alone never could. It's a critical design choice for brands that want to create truly engaging digital platforms.
We've moved way beyond simple GIFs. Modern animated website backgrounds often include dynamic particle effects or abstract shapes that respond to a user's mouse movements. This shift is part of a larger trend in web design where micro-interactions provide subtle but valuable feedback. If you're curious about what's next, you can dive deeper into the future of web animation trends over on onocreative.co.uk.
A quick tip from my experience: The best animated background isn't the star of the show. It's the perfect supporting actor that makes your main content—your products, services, and message—shine even brighter.
Animated backgrounds offer a host of advantages that directly influence both user perception and business goals. Here’s a quick breakdown of the core benefits.
Key Benefits of Animated Backgrounds
| Benefit | Impact on User Experience | Business Outcome |
|---|---|---|
| Increased Engagement | Creates a more immersive and interactive session, encouraging longer visit durations. | Higher user retention and lower bounce rates. |
| Enhanced Storytelling | Communicates brand identity and values non-verbally, creating an emotional connection. | Stronger brand recall and differentiation from competitors. |
| Improved Navigation | Subtly guides user focus towards key CTAs and important content sections. | Increased conversion rates on forms and sales funnels. |
| Modern & Professional Feel | Signals a commitment to quality and innovation, building user trust. | Improved brand perception and credibility. |
| Memorable Experience | Makes the website stand out from static competitors, leaving a lasting impression. | Greater likelihood of return visits and word-of-mouth referrals. |
As you can see, the impact goes far beyond just looking cool. These elements are a strategic investment in the overall user journey.
From Passive Viewing to Active Participation
Perhaps the biggest win here is the shift from passive browsing to active engagement. When elements on the page react to a user’s cursor, it creates an immediate sense of connection and control.
This interactivity can turn a routine visit into something genuinely delightful, encouraging people to stick around and explore. It’s not just about aesthetics; it’s about crafting a superior user experience that shows you care about the details. That kind of attention to quality directly shapes how users perceive—and remember—your brand.
Preparing Your Elementor Environment for Animation
Before you even think about dropping in that first Lottie file, let's talk about setting the stage. From my own experience, I can tell you that jumping straight into the creative part without prepping your workspace is a recipe for frustration. A few minutes of setup now will save you from those head-scratching moments later when something just isn't working right.
The whole magic behind what we're about to build relies on two essential plugins: the Elementor page builder and Exclusive Addons for Elementor. If you're new to this, your first job is to get both installed and activated right from your WordPress dashboard. Think of Exclusive Addons as the powerhouse that unlocks all the cool animation widgets and extensions we’ll be playing with.
Once they're installed, take a quick moment to make sure they're playing nicely. It’s a simple check that can prevent a lot of headaches.
- Check for updates: Always run the latest versions of both Elementor and Exclusive Addons. This is the number one way to dodge compatibility bugs.
- Verify active widgets: Pop over to the Exclusive Addons settings in your dashboard. You'll want to confirm that the animation-related goodies, like the Lottie Animation widget, are enabled.
- Clear your cache: If you have a caching plugin running (and you should!), give it a quick clear. This ensures you’re seeing your live changes in the editor, not a stale, saved version.
Configuring Your Workspace for Success
With the technical bits sorted, a little housekeeping inside the Elementor editor itself is a game-changer. I always recommend creating a dedicated folder in your WordPress Media Library just for your animation files—your Lottie JSONs, custom particle images, you name it. It sounds simple, but when you're deep into a big project, you'll thank yourself for not having to hunt through a messy library.
A well-organized setup is the secret to a frustration-free design process. Taking ten minutes to prepare your environment can save you hours of headaches when implementing complex animations.
This groundwork is all about getting your canvas prepped and your paints mixed before you start the masterpiece. It ensures you have every tool you need, right where you expect it to be, without any technical hiccups getting in your way. For a more detailed walkthrough of the specific settings, our guide on how to add background animation on WordPress dives even deeper.
Now that your setup is solid, you're ready to start bringing those stunning animated backgrounds to life.
Using Lottie Animations for Vibrant Backgrounds
If you're ready to ditch static visuals, Lottie animations are one of the best ways to bring fluid, high-quality motion to your website. And the best part? You can do it without the performance hit you’d get from a traditional video or GIF file. They are a true game-changer for creating lively and engaging animated website backgrounds.
So, what exactly is a Lottie? Just think of it as animated vector art. It’s a JSON-based animation file format that lets designers use animations on any platform as easily as they’d use a static image. Because they're vector-based, they're incredibly lightweight and can be scaled to any size without losing quality—a perfect match for modern web design.
The demand for dynamic digital content is exploding. The animation industry is on track to hit a global market size of around $393.39 billion in 2025, with some forecasts predicting it will soar to nearly $631.52 billion by 2034. This isn't just about cartoons; it's about animation being baked into advertising, gaming, and innovative web design, proving just how valuable engaging visuals have become.
Finding and Adding Your Lottie Animation
Before you can add an animation, you obviously need to find one. Thankfully, there are some fantastic resources out there for high-quality Lottie files.
- Free Repositories: I always recommend starting with a site like LottieFiles. It has a massive library of free animations from a global community of designers. It’s the perfect place to grab a file and start experimenting.
- Premium Marketplaces: If you need something more unique or custom-branded, you can check out premium marketplaces where professional animators sell their work.
- Create Your Own: Feeling adventurous? If you've got motion design chops, you can create your own Lottie animations using software like Adobe After Effects with the Bodymovin plugin.
Once you have your JSON file, implementing it with Exclusive Addons is a piece of cake. Just drag the Lottie Animation widget into any Elementor section or column. This widget is your gateway to bringing these cool animations to life on your site.
Fine-Tuning Your Animated Background
After you drop the widget in, you’ll see an upload field right in the Elementor panel. This is where you can add your JSON file straight from your media library.
The settings panel gives you total control over how the animation behaves, letting you tailor it perfectly to your design needs.
From here, you can really dial in the specifics. The Exclusive Addons widget gives you a bunch of key controls to make sure the animation fits seamlessly into your background.
Pro Tip: When using a Lottie as a background, always enable the "Loop" option. This is critical for making the animation play continuously, creating a smooth, uninterrupted effect for your visitors.
You can tweak things like playback speed, autoplay, and looping behavior. For instance, a subtle, slow-moving background might work best with a playback speed of 0.5, while a more high-energy animation could be cranked up to 1.5. The goal is to match the animation's vibe to your brand's personality. To see everything you can do, check out the complete overview of the Lottie Animation widget features on our site.
One of the most common challenges I see is making sure the main content—like headlines and buttons—stays perfectly readable over the animation. An easy fix for this is to head over to the "Style" tab of your section settings and use the background overlay option. Applying a semi-transparent color overlay (say, black at 50% opacity) can tone down the background animation just enough to make your foreground text pop. It’s all about finding that perfect balance between visual flair and usability.
While a bold Lottie animation is fantastic for telling a story, sometimes your design calls for something more atmospheric and interactive. This is where particle effects really shine. They can transform a static, boring background into a responsive canvas that subtly reacts to your visitor's every move.
We'll be using the Background Particles extension from Exclusive Addons to create these mesmerizing networks of moving dots and lines. It’s a seriously cool feature.
One thing to know is that this isn't a separate widget you drag onto the page. Instead, it’s an extension that you can apply to any Elementor section. Just click on the section you want to animate, head over to the Advanced tab, and flip the switch for EA Background Particles. Just like that, you've opened up a whole new world of customization for creating truly unique animated website backgrounds.
Customizing Your Particle Network
Okay, this is where the fun begins. The settings panel is where you take a generic particle effect and sculpt it into something that perfectly matches your brand's vibe. You have complete control over the animation's visual DNA.
You'll want to start by tweaking the core components:
- Number of Particles: This controls the density. Fewer particles give you a clean, minimalist feel, while cranking up the number creates a much denser, more intricate web of motion.
- Particle Color: You can go with a single, uniform color for a sleek look. Or, for something more dynamic, define a few different colors and have the particles randomly cycle through them.
- Shape and Size: Don't just stick with circles! You can choose squares or even upload custom images to use as particles. I also like to set a size range, which makes some particles bigger than others and gives the whole effect a more natural, organic feel.
- Movement Speed: This is your secret weapon for setting the mood. Slow speeds feel calm and professional. Faster speeds can create a high-energy, almost futuristic atmosphere.
Think about how these simple sliders can totally change the user's perception. A web design agency might go for 50 small, white, slow-moving circular particles to project a clean, modern aesthetic. On the flip side, a gaming site could use 200 fast-moving, multi-colored square particles to amp up the excitement.
Making It Interactive and Engaging
Here’s what really elevates this feature from a simple animation to a genuine user experience: interactivity. You can make the background feel truly alive by having it react to the user's cursor. This small touch turns a passive viewing experience into an active, engaging one.
The most compelling designs create a subtle dialogue between the user and the interface. Interactive particles that respond to a cursor aren't just a visual gimmick; they are a form of micro-interaction that makes a website feel more responsive and delightful to use.
Inside the settings, you can define exactly how the particles should react on hover. The ‘Grab’ mode is pretty cool; it lets users temporarily connect particles with their cursor as they move it around. The ‘Push’ mode does the opposite, making particles scatter away from the cursor. This level of interaction adds a sophisticated, memorable layer to your design.
This trend toward more dynamic visuals isn't just a fad; it's a major shift in web design. The global animation market was valued at a whopping USD 327.12 million in 2023, which shows just how much demand there is for engaging digital content. If you want to dive deeper into the numbers, you can check out the full market analysis on globalgrowthinsights.com.
By mastering tools like particle effects, you're not just adding a bit of motion. You're building a more engaging, modern, and memorable user journey.
Layering Glassmorphism and Parallax for Added Depth
Okay, so you've got your Lottie files and particle effects running. That’s a fantastic start. But if you want to create those truly jaw-dropping designs that feel layered and multi-dimensional, you need to start combining techniques. This is where you graduate from a simple animated background to crafting a rich user experience.
Two of my favorite effects to layer on top are Glassmorphism and parallax scrolling.
Glassmorphism is that slick, "frosted glass" look that’s become a huge trend in UI design. It's the perfect companion for a busy animated website background. Why? Because it elegantly blurs whatever is moving behind it, creating a perfect, readable surface for your content while still letting that background motion peek through.
Think about a hero section: your main headline and call-to-action sit on a semi-transparent, blurred panel that seems to float effortlessly over your particle animation. This immediately establishes a clear visual hierarchy and gives the whole design a touch of modern class.
With Exclusive Addons, you don't have to mess with any custom code to get this done. It's a built-in extension. Just grab any Elementor widget, section, or column, pop over to the Advanced tab, and flick on the Glassmorphism switch.
Achieving the Perfect Frosted Look
Once enabled, you can start tweaking the settings to nail the exact aesthetic you’re going for. The secret is finding that sweet spot between transparency and blur.
- Blur: This setting controls just how frosty the glass gets. A higher value will blur the background animation more, which is great for making the text on top super readable.
- Saturation: You can use this to either make the colors from the background pop through the glass or tone them down for a more muted, monochrome feel.
- Transparency: This is all about how much of the background animation shows through. I’ve found that a subtle transparency around 0.2 to 0.4 usually hits the mark perfectly without being distracting.
Playing with these settings creates a gorgeous sense of depth. You can really dive deep into all the controls and find more creative applications by checking out the Glassmorphism effect from Exclusive Addons.
To take this a step further, let's bring parallax into the mix. Parallax scrolling makes different elements move at different speeds, creating a genuine 3D illusion. By enabling Elementor’s native parallax motion effects on your background section, you can make the animation scroll slower than the Glassmorphism panel in front of it.
Of course, with all these cool effects, we have to keep an eye on performance. Stacking animations can be demanding. Here’s a quick look at how different animation types generally stack up.
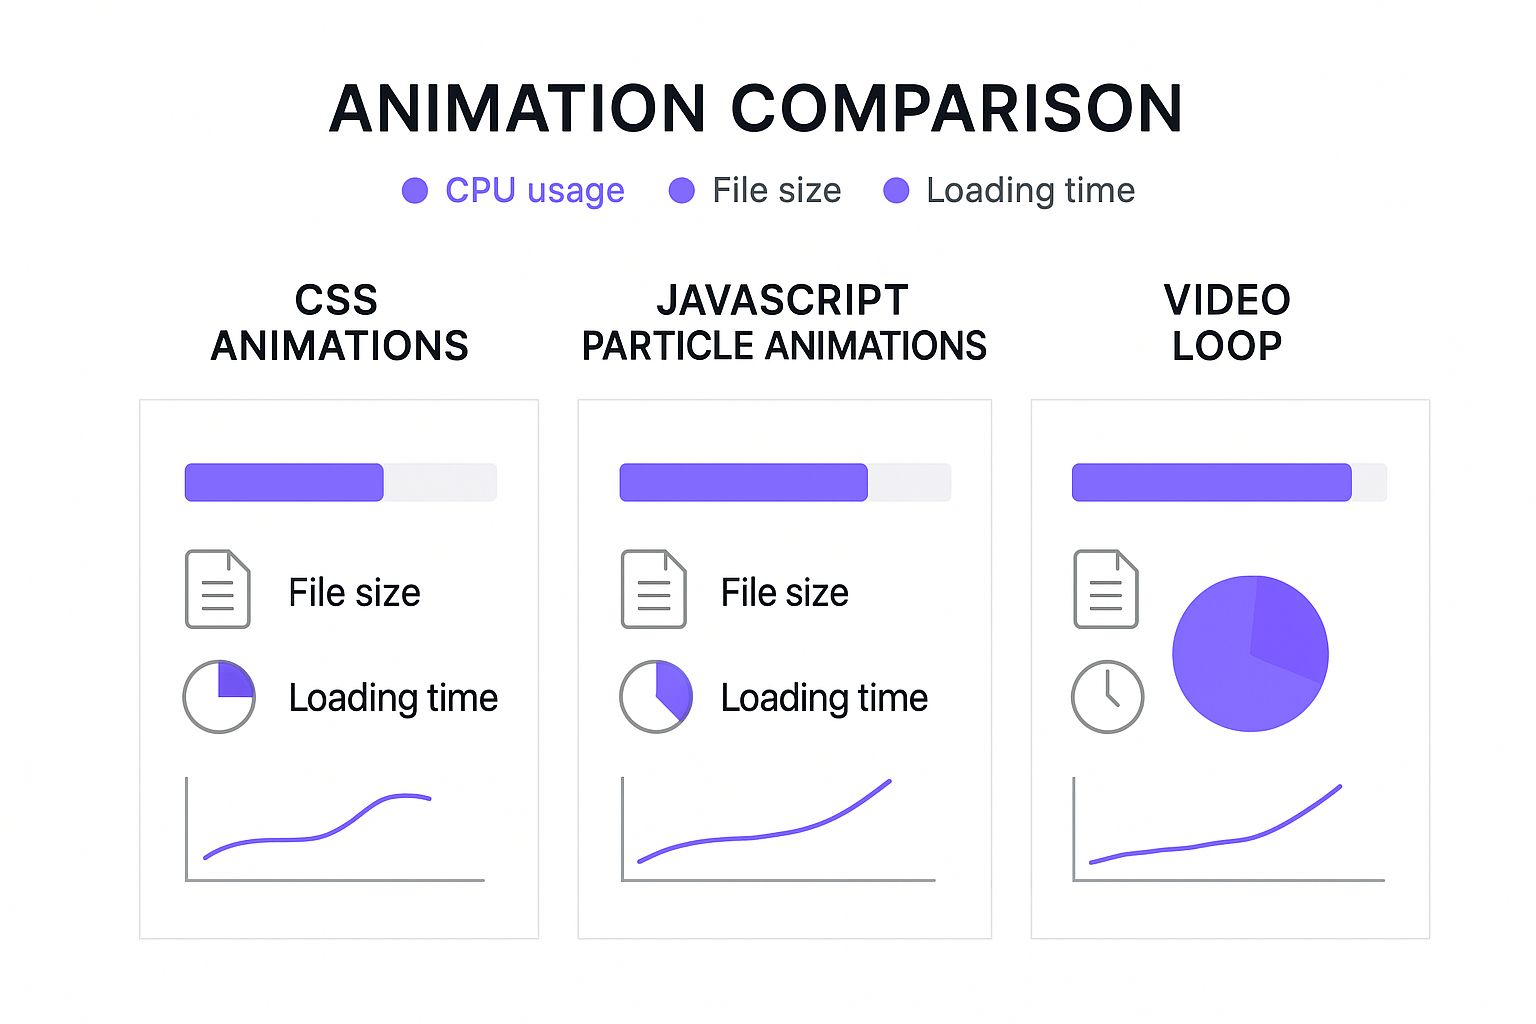
As you can see, JavaScript and video-based animations tend to have a bigger performance footprint. It’s something to be mindful of when you're building out these more complex, layered designs.
When a user scrolls and sees that frosted panel gliding independently over the vibrant animation behind it, the effect is absolutely captivating. It’s this thoughtful combination of layers—texture, motion, and depth—that makes a website feel truly polished and memorable. You’re not just building a page; you’re creating an interactive journey.
To help you decide which animation technique is the best foundation for your project, especially when you plan on layering effects like Glassmorphism, here’s a quick comparison.
Animation Technique Comparison
| Technique | Best For | Performance Impact | Customization Level |
|---|---|---|---|
| Lottie | Complex, vector-based animations; logos; interactive icons. | Low to Medium | High (with After Effects) |
| Particle.js | Interactive, ambient backgrounds; abstract moving patterns. | Medium | High (within the widget) |
| Parallax | Creating depth and 3D illusion on scroll. | Low | Medium |
| Glassmorphism | Layering UI elements over busy backgrounds; modern aesthetic. | Low | High |
Each technique has its strengths. Lottie is king for detailed vector work, while particles are unmatched for interactive, ambient motion. Choosing the right base layer before adding effects like Glassmorphism and parallax is key to balancing visual "wow" with a smooth user experience.
Optimizing Performance with Animated Backgrounds
Let's be honest, a jaw-dropping animation is useless if it makes your website grind to a halt. While creating beautiful animated website backgrounds is the fun part, making sure they don't destroy your load times is absolutely critical for both user experience and SEO. A sluggish site sends bounce rates through the roof, and nobody wants that.
Your first, and most impactful, move is to pick the right animation format. I see a lot of people reaching for GIFs or video files, but lightweight formats like Lottie are a much smarter choice. A Lottie animation is just a small JSON file, often a tiny fraction of a GIF's size. You get stunning visual quality with dramatically faster load times. It's a no-brainer.
The real art is striking that perfect balance between impressive visuals and a fast, responsive website. Performance isn't something you bolt on at the end; it's a core part of the design process from the very beginning.
Even with a lightweight format, you're not done yet. Always compress your animation assets as much as possible before you even upload them. For animations that are "below the fold" (further down the page), implementing lazy loading is a non-negotiable. This simple trick stops the animation from loading until a user actually scrolls it into view, which can shave precious seconds off your initial page load.
Smart Optimizations for Different Devices
What looks fantastic on a high-powered desktop can easily cripple a mobile device on a shaky 4G connection. This is where you need to start thinking conditionally. Thankfully, Elementor and Exclusive Addons give you some serious firepower with their responsive controls, allowing you to completely disable complex animations on mobile or tablet views.
Here are a few practical things I do on almost every project:
- Responsive Visibility: I'll often use Elementor's responsive settings to just hide the entire section with the heavy animation on smaller screens. A clean, lightweight static image can be a great substitute to maintain a solid user experience.
- Simplify on Mobile: Instead of trying to force a complex particle animation to work on a phone, why not swap it out for a simple, elegant gradient background? It keeps the vibe without the performance hit.
- Test, Don't Guess: Your gut feeling isn't a reliable metric. Use a tool like Google PageSpeed Insights to test your site's performance before and after adding your animations. The data doesn't lie, and it will show you exactly what impact your design choices are having.
To really get ahead of any potential slowdowns from your animations, it's worth digging into some advanced website speed optimisation techniques. By thoughtfully managing your assets and tailoring the experience for different devices, you can deliver that "wow" factor without sacrificing the speed and accessibility that modern users demand.
Of course, when you start diving into something new like animated backgrounds, a few questions are bound to pop up. It's totally normal. Let's tackle some of the most common ones I hear from designers.
Will Animated Backgrounds Grind My Site to a Halt?
This is the big one, isn't it? And the honest answer is: they can, but only if you're careless.
The trick is to be smart about your implementation. Forget about heavy GIFs or massive video files. Your best bet is to use super-lightweight formats like Lottie animations (which are just small JSON files). You should also think about disabling more complex animations on mobile and maybe even lazy load elements that are further down the page.
After you've set everything up, always run your site through a speed test. Don't just assume it's fine—check it.
Are Animated Backgrounds Actually Good for SEO?
Directly? No. Google doesn't look at your cool particle effect and give you a ranking boost.
But indirectly? Absolutely. Engaging animations can seriously improve metrics that search engines do care about, like how long visitors stick around (time on page) or how many leave after viewing just one page (bounce rate).
The golden rule is to make sure your animations don't kill your site's performance. A beautiful, slow-loading site will never outrank a faster competitor. Performance is a huge SEO ranking factor, so don't sacrifice it.
Can I Just Use a Regular Video for My Background?
You can, and Elementor makes it pretty easy to do. However, this guide has really focused on more optimized methods like Lottie and particle effects for a reason. They give you those rich, dynamic visuals but with a much, much smaller file size. This keeps your pages snappy and light.
Ready to move beyond static designs and create those stunning, high-performance animated backgrounds yourself—without having to touch a single line of code? Exclusive Addons provides all the widgets and extensions you need to truly bring your Elementor creations to life.