
Let's be honest, staring at a slow-loading Elementor site is a frustratingly common experience. It’s more than just a minor annoyance, though—it’s a direct hit to your SEO and user experience. I’ve seen it time and time again: a beautiful design that takes forever to appear.
The good news? You can absolutely have a lightning-fast Elementor site. The secret isn't one magic button, but a combination of performance-first hosting, smart caching, and a disciplined approach to asset optimization. It all comes down to addressing the root causes, from the server right up to how you actually build your pages.
Why Your Elementor Site Is Slow and How to Fix It
Elementor is an incredible tool, but all that power has a trade-off. Every time you drag and drop a widget, you're adding extra layers of code (HTML, CSS, and JavaScript) to create those fantastic designs. When you pile on unoptimized images, sluggish hosting, and a boatload of plugins, your site’s performance can grind to a halt.
It's rarely a single problem but a "death by a thousand cuts" situation caused by a mix of factors:
- Heavy Code Output: Each widget, section, and column adds to the page's final code. Without a strategy to manage it, this "code bloat" forces a visitor's browser to download and process way more data than necessary, delaying when your content actually shows up.
- Unoptimized Images and Media: This is probably the biggest and most common offender. High-resolution images that haven't been compressed are massive files. Every single one has to be downloaded by your visitors, and it adds up fast.
- Slow Server Response Time: A cheap hosting plan might seem like a great deal at first, but if the server is slow to even begin sending the first piece of data (a high Time to First Byte or TTFB), nothing else you do to optimize your site will make a significant difference. It's the foundation of your site's speed.
- Plugin and Add-on Overload: Every Elementor add-on and general WordPress plugin you install has the potential to load its own scripts and styles. This not only adds to the performance burden but can also create conflicts that slow things down even further.
The Real-World Impact of Elementor on Speed
This isn't just theory; the performance difference is very real and measurable. In one controlled test I saw, a site built with Elementor took about 5.5 seconds to load. A standard WordPress site, on the exact same server, loaded in just 2.2 seconds.
That’s nearly 2.5x slower. When you consider that every second counts for keeping users engaged and satisfying Google's Core Web Vitals, that's a huge gap you need to close.
Key Takeaway: You absolutely do not have to ditch Elementor to get a fast website. The solution is to be proactive and deliberately counteract its performance overhead with the right optimizations.
Think of this guide as your roadmap. We’ll start with the foundational fixes that give you the biggest wins and then move into more advanced tweaks. For a broader look at performance that applies to any WordPress site, our guide on how to improve website loading speed is a great companion piece. The key is to be methodical, and we'll show you exactly how to tackle each bottleneck.
Quick Fixes vs Foundational Strategies for Elementor Speed
It helps to think about optimizations in two buckets: things you can do right now for an immediate boost, and long-term strategies that create a solid foundation for sustained performance.
| Optimization Area | Quick Fix (Immediate Impact) | Long-Term Strategy (Sustained Performance) |
|---|---|---|
| Hosting | Enable server-level caching if available. | Migrate to a high-quality, performance-focused host (e.g., Cloudways, Kinsta). |
| Caching | Install and configure a caching plugin like WP Rocket. | Fine-tune caching settings; integrate with a CDN like Cloudflare. |
| Images | Use an image compression plugin on existing media. | Implement a "compress-before-upload" workflow; use next-gen formats (WebP). |
| Plugins & Addons | Deactivate and delete unused plugins. | Regularly audit plugins; use an asset manager to disable unused CSS/JS on a per-page basis. |
| Elementor Settings | Enable Optimized DOM Output and Improved Asset Loading. | Rebuild "heavy" pages with fewer widgets; use global styles to reduce code redundancy. |
| Content Delivery | — | Implement a Content Delivery Network (CDN) to serve assets from global locations. |
These "quick fixes" are perfect for getting some fast wins, but the real, lasting speed comes from implementing the long-term strategies. A fast site isn't a one-and-done task; it's the result of building and maintaining with performance in mind from day one.
Build on a High-Performance Hosting Foundation

Before you touch a single setting in Elementor, we need to talk about where your site actually lives. Your website's performance isn't just about the page builder; it starts with your hosting environment. Think of it like a race car—it doesn't matter how sleek the design is if the engine is sputtering and weak.
A budget shared hosting plan might look tempting, but it's often the single biggest bottleneck for a powerful tool like Elementor. These plans cram hundreds, sometimes thousands, of websites onto one server, forcing everyone to fight over the same limited pool of resources.
When another site on that server gets a traffic spike, your site pays the price. That environment simply wasn't built for the demands of a modern page builder, which leads to a sluggish Elementor editor and a painfully slow live site.
Distinguishing Between Hosting Tiers
Understanding the different hosting types is crucial. Each one offers a different level of resources and control, which directly impacts how fast Elementor can run.
- Shared Hosting: This is the entry-level option where your site shares server resources (CPU, RAM) with many others. It's cheap, but it's a recipe for slow performance and high Time to First Byte (TTFB) because you're always competing for power.
- Virtual Private Server (VPS) Hosting: This is a big step up. A VPS gives you a dedicated slice of a server's resources. While you still share the physical machine, your allocated RAM and CPU are yours alone. This provides much more consistent and reliable performance.
- Managed WordPress Hosting: The premium route. These hosts, like Kinsta or Cloudways, are specifically optimized for WordPress. They handle all the server management, security, and performance tweaks for you, often building their platforms on top-tier cloud infrastructure.
For any serious project built with Elementor, you really need to be on a VPS or Managed WordPress Hosting plan. I consider it the bare minimum. The guaranteed resources make a night-and-day difference in both backend editing speed and frontend load times.
Key Hosting Features That Matter for Elementor
When you're shopping for a host, don't get sidetracked by vanity metrics like "unlimited storage." You need to focus on the technical specs that actually influence speed.
- Guaranteed RAM: Elementor is memory-hungry. To get a smooth editing experience, look for plans with at least 1GB of dedicated RAM. If you're running a larger site or anything with WooCommerce, 2GB or more is what I'd recommend.
- Server Location: Pick a host that has data centers physically close to your target audience. This simple choice reduces network latency—the time it takes for data to travel from the server to your visitor's browser.
- Latest PHP Version: Every new version of PHP brings significant performance boosts. Make sure your host supports PHP 8.1 or newer and lets you switch versions easily. Running on old PHP is like putting dirty oil in a new engine.
Elementor's resource needs are a key factor when comparing it to other builders. Choosing the right page builder for speed can depend on page complexity and server power. While some builders may load faster on simple pages, Elementor often excels with complex designs and dynamic queries, provided it has enough server muscle. Discover more insights about Divi vs. Elementor speed at WPAllImport.com.
Essential Server-Level Tweaks
Once you've secured solid hosting, there are a couple of server-side adjustments you should make to create the perfect environment for Elementor.
The first is your WordPress Memory Limit. This isn't the same as your server's total RAM; it's a specific PHP setting that tells WordPress how much memory a single script can use. By default, WordPress sets this to a paltry 40MB.
For Elementor, that's just not enough. It's a common cause for the editor crashing or failing to load entirely. You should increase this value to at least 256MB, though I personally set it to 512MB. Just add the following line to your wp-config.php file:
define( 'WP_MEMORY_LIMIT', '512M' );
This one change can solve a huge number of "the editor won't load" headaches. It gives Elementor the breathing room it needs to do its job without hitting a resource wall. By getting this robust server foundation in place, you're setting the stage for all your other optimizations to succeed and letting Elementor run at its full potential.
Use Caching and CDNs for an Instant Speed Boost
If your hosting is the engine of your website, think of caching as the turbocharger.
Without it, your server has to build every single page from scratch, for every single visitor. This constant, repetitive work drains server resources and is one of the biggest culprits behind slow Elementor sites.
Here’s what’s happening in the background: when someone lands on a page, WordPress and Elementor need to grab content from the database, process a bunch of PHP, and then assemble the final HTML file. Caching cuts this entire process short by creating a pre-built, static version of that page. The next time someone visits, the server just hands over that finished version instantly.
This one change takes a massive load off your server and dramatically improves your site's Time to First Byte (TTFB), which is a huge deal for performance.
Getting a Handle on the Different Caching Types
Caching isn't just one thing; it's a few different methods working together. For any Elementor site, the ones that really matter are page caching, browser caching, and object caching. Each plays a specific part in making your site feel noticeably faster.
If you want to go really deep, we have a full guide on how WordPress caching works, but here's the quick-and-dirty breakdown:
- Page Caching: This is the big one. It saves the complete HTML output of a page, so the server can deliver it without running PHP or querying the database. This is the main job of plugins like WP Rocket and LiteSpeed Cache.
- Browser Caching: This tells a visitor's web browser to keep local copies of your static files—think CSS stylesheets, JavaScript files, and images. When they click to another page, their browser already has those assets and doesn't have to download them all over again.
- Object Caching: This one is a bit more advanced and happens at the server level. It stores the results of common database queries. For sites with a lot of dynamic action, like e-commerce or membership sites, this can be a game-changer for reducing database strain.
The Best Caching Plugins for Elementor
For most people, a good caching plugin is the simplest and most effective way to get all this working. A couple of plugins, in particular, play exceptionally well with Elementor.
1. WP Rocket
This is pretty much the gold standard for a reason. It's incredibly easy to use but packs a serious punch, combining page caching, file optimization (like minification), lazy loading for images, and database cleanup all in one place. It just works with Elementor right out of the box.
2. LiteSpeed Cache
If your site is hosted on a server running LiteSpeed (like you'd find with ChemiCloud or Rocket.net), this free plugin is an absolute no-brainer. It uses powerful server-level caching that’s typically much faster than the PHP-based caching other plugins rely on. Plus, it throws in image optimization and other tools to help with Core Web Vitals.
Pro Tip: Whatever you do, only use one page caching plugin. Running multiple caching or optimization plugins at the same time is a guaranteed recipe for conflicts, broken pages, and a slower site—the exact opposite of what you’re trying to do.
Go Global with a CDN
A Content Delivery Network (CDN) takes the concept of caching and puts it on a global scale. Instead of your entire website being served from one physical server location, a CDN makes copies of your static assets—your images, CSS, and JS files—and distributes them to a worldwide network of servers.
So when a visitor from Japan tries to load your site that's hosted in New York, the CDN serves those files from a local server in Tokyo. This drastically cuts down the physical distance the data has to travel, which slashes latency and makes your site load way faster for your international audience.
A couple of popular choices are:
- Cloudflare: Offers a fantastic free plan with a massive global network. Their APO (Automatic Platform Optimization) feature is especially powerful for WordPress sites.
- BunnyCDN: A highly-rated and affordable premium CDN known for its top-tier performance and simple setup.
Hooking up a CDN is one of the most impactful things you can do to speed up your Elementor site for everyone, no matter where they are.
Once you've sorted out your hosting and caching, the next big performance roadblock is almost always your website's assets. I'm talking about those massive, unoptimized images and bloated scripts that are the silent killers of website speed. A single 2MB background photo can easily add seconds to your load time, completely undoing all the hard work you just did on the server side.
This is where the real battle for a fast site is often won or lost. Every image, every CSS file, and every JavaScript snippet adds to your page's total weight. Your job is to get these assets as lean as possible without ruining the user experience. It's a hands-on process, but it directly impacts your Core Web Vitals and makes your site feel snappy from the moment a visitor lands.
Master Your Image Optimization Workflow
Images are almost always the heaviest part of a webpage. If you want to speed up Elementor, getting them under control is non-negotiable. A disciplined workflow is your best friend here.
First things first: resize images to their correct dimensions before you upload them. If an image is only ever going to be displayed at 800 pixels wide, there is absolutely no reason to upload the original 4000-pixel version. Use a free tool like GIMP or any online editor to get the dimensions right from the start.
Next up is compression. This process shrinks the file size by stripping out unnecessary data, often with little to no visible drop in quality. Plugins like ShortPixel or Imagify can automate this for you, which is a huge time-saver.
A critical move you need to make is shifting to next-gen image formats like WebP. WebP images are typically 25-34% smaller than JPEGs at a similar quality, which is a massive win for file size reduction. Many modern optimization plugins can handle this conversion for you on the fly.
Finally, you absolutely have to implement lazy loading. This brilliant technique stops offscreen images and iframes from loading until a user actually scrolls down to them. This dramatically speeds up the initial page load because the browser isn't stuck trying to download every single image at once. Most good caching plugins, including WP Rocket, have this feature built right in.
A Practical Comparison of Image Optimization Techniques
Choosing the right image optimization method can feel a bit overwhelming. Let's break down the most common techniques so you can pick the right tool for the job. Each has its place, and the best setups often use a combination of these.
| Technique | Description | Best For | Recommended Tools |
|---|---|---|---|
| Lossless Compression | Reduces file size without any quality loss by removing metadata. | Logos, icons, and graphics where perfect clarity is essential. | Imagify, ShortPixel |
| Lossy Compression | Significantly reduces file size by slightly degrading image quality. | Photographs and complex images where a tiny quality drop is unnoticeable. | TinyPNG, ShortPixel (Glossy setting) |
| WebP Conversion | Serves images in a modern, highly efficient format to compatible browsers. | All image types; it provides the best balance of quality and size. | Optimole, WebP Express, EWWW Image Optimizer |
| Lazy Loading | Defers loading of below-the-fold images until they are needed. | Long pages with many images, like blog posts and image galleries. | WP Rocket, Perfmatters, LiteSpeed Cache |
By understanding these options, you can create a robust workflow that ensures your images are always served in the most efficient way possible.
Taming Your CSS and JavaScript Files
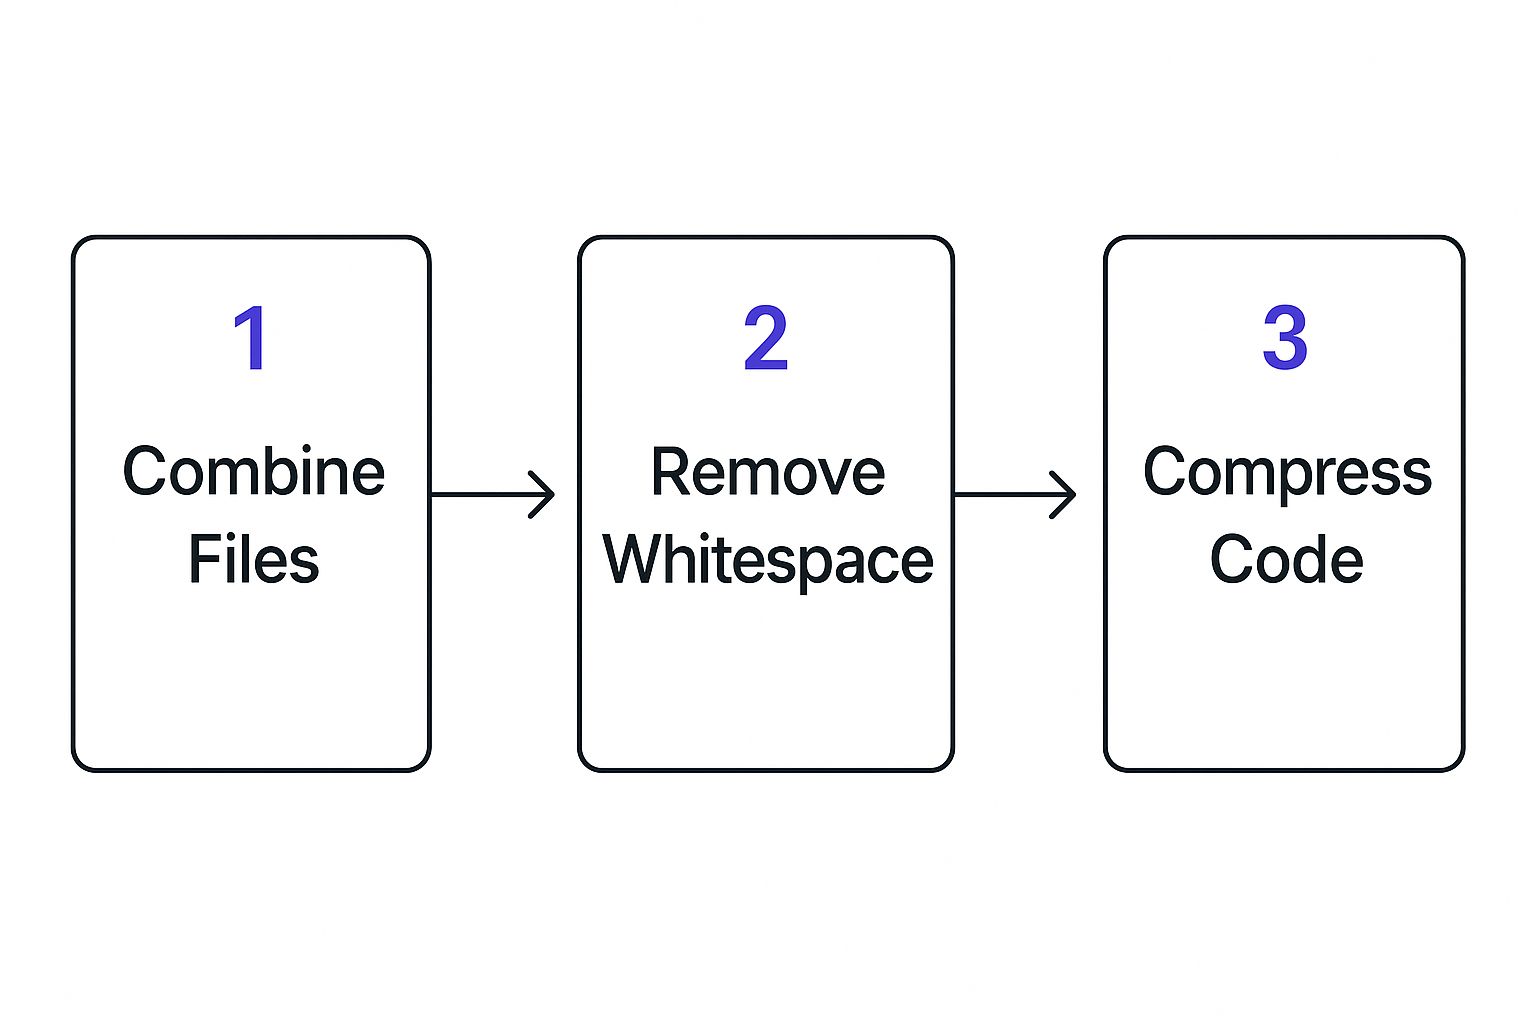
Elementor, its add-ons, and your other plugins all load their own CSS and JavaScript files. If left unchecked, this can create a long chain of requests that grinds your site to a halt. The solution? Minify, combine, and defer these scripts.
Here’s a quick rundown of what that means:
- Minification: This is the process of removing all unnecessary characters from your code—think whitespace, comments, and line breaks—without changing how it works. Smaller file, faster download.
- Combining: This merges multiple CSS or JavaScript files into a single one. It reduces the number of HTTP requests a browser needs to make, which can be a big speed boost on older servers.
- Deferring: This is a key strategy. It tells the browser to wait to download and run non-critical JavaScript until after the main page content has loaded, significantly improving your First Contentful Paint (FCP).
You can manage some of this directly within Elementor’s settings, but for more granular control, a dedicated tool like WP Rocket or Perfmatters is the way to go.
Even with its reputation for potential bloat, a well-tuned Elementor site can be surprisingly quick. I’ve seen it firsthand. Despite having a larger page size in some tests, Elementor's First Contentful Paint was 2.5 seconds compared to a competitor's 3.1 seconds. This just goes to show how efficient it can be when you optimize it correctly.
For a complete look at asset optimization that goes beyond just Elementor, check out our guide on how to optimize your WordPress site. By applying these techniques, you’re already well on your way to a much faster website.
Beyond the big-picture server and asset optimizations, Elementor itself has a powerful—and often ignored—suite of performance features tucked away in its settings. Activating these and adopting smarter building habits can dramatically slash the "Elementor bloat" that bogs down so many sites. Honestly, how you build your pages is just as critical as the tools you use.
The journey starts right in your WordPress dashboard. If you head over to Elementor → Settings → Experiments, you’ll find a list of features designed to make the builder way more efficient. The word "Experiments" might sound a little scary, but many of these are stable, well-tested, and totally ready for live sites. Turning them on is the first crucial step to telling Elementor you want it to generate leaner, faster code.
These aren't just random toggles; they directly tackle common performance bottlenecks that page builders can create. Once you understand what they do, you can make informed decisions and speed up your site from the inside out.
Unlocking Elementor’s Built-in Performance Features
Inside that Experiments tab, a few features offer immediate wins by changing how Elementor generates its code and loads assets. For a quick and substantial performance boost, you should seriously consider flipping these on.
- Optimized DOM Output: This one is a non-negotiable. It cleans up Elementor's code by stripping out unnecessary HTML wrapper elements (
<div>tags). A cleaner, smaller Document Object Model (DOM) is much easier and faster for browsers to render, which directly addresses that pesky "avoid an excessive DOM size" warning you see in PageSpeed Insights. - Improved Asset Loading: This is a smart feature that stops Elementor from loading JavaScript for things like popups or animations on pages where you aren't even using them. The result is fewer scripts to download and process, which is always a win.
- Improved CSS Loading: Much like the asset loading improvement, this experiment makes sure the CSS for specific widgets only loads on pages where those widgets actually exist. This prevents your site from loading one massive, site-wide stylesheet full of code it doesn't need on every single page.
- Inline Font Icons: Instead of making a separate request to load entire font libraries like Font Awesome just for a handful of icons, this feature embeds them as inline SVG code. This cuts down on HTTP requests and helps fix render-blocking CSS issues.
Flipping these switches is one of the easiest ways to attack code bloat head-on, all without changing a single thing on your actual pages.
Build Lighter Pages with Smarter Habits
Once you've dialed in Elementor's settings, the spotlight turns to your own building workflow. The most beautifully designed page can become a performance nightmare if it's put together inefficiently. The goal is simple: achieve your design with the least amount of code possible.
A classic mistake I see all the time is creating deeply nested sections. This is when you put sections inside of other sections, which then have multiple columns and even more inner sections. Each layer adds more container divs, bloating the HTML and making the page a slog for browsers to parse.
Key Takeaway: Challenge yourself to build with a flatter structure. Before you nest another section, ask if you can get the same layout with fewer containers. You'd be surprised how often some creative use of margins, padding, and positioning can produce the exact same visual result with a fraction of the code.
Another game-changing technique is to lean heavily on Global Styles and Global Widgets. Instead of styling every single button, headline, and form field one by one, define those styles once in your Site Settings.
This pays off in two major ways:
- Consistency: Your design stays perfectly consistent across your entire website. No more rogue button colors.
- Performance: It massively reduces code redundancy. Elementor can just apply a single CSS class instead of generating unique inline styles for every element, leading to much cleaner and smaller stylesheets.
The Role of Third-Party Add-ons
Let's be real: not all Elementor add-ons are created equal. While tools like our own Exclusive Addons are built from the ground up with performance in mind—loading assets modularly—many others are not. A bloated add-on pack that loads its entire CSS and JavaScript library on every single page can absolutely cripple your site's speed, even if you only use one or two of its widgets.
Be ruthless with your plugins. Before you install a new add-on, ask yourself: "Do I really need this, or can I get it done with core Elementor widgets?" If you do decide to install one, use a tool like Perfmatters or Asset CleanUp to see exactly what files it’s adding. Then, go in and disable those scripts on pages where they aren't being used. Every script you prevent from loading is a small victory for performance.
Answering Your Top Elementor Speed Questions

Even after laying out a solid game plan, you're bound to run into some specific questions once you start getting your hands dirty with Elementor optimization. It just comes with the territory. So, I've put together this section to tackle the most common questions I hear.
Think of this as your go-to guide for those nagging "what if" scenarios. Getting these details right can be the difference between a decent score and a fantastic one.
Is a 90+ PageSpeed Score Realistic with Elementor?
Yes, absolutely. But let me be straight with you: it takes work and a holistic approach. Hitting that coveted 90+ score with Elementor isn't about finding one secret trick; it’s the result of stacking all the right practices on top of each other.
It really comes down to a commitment to performance from the ground up. This means you need:
- A high-performance hosting environment that isn't holding you back.
- Aggressive caching, either through a top-tier plugin like WP Rocket or server-level caching if you're on a LiteSpeed server.
- Meticulous asset optimization—compressing every image, serving WebP formats, and lazy loading everything you can.
- Enabling Elementor’s own performance experiments, especially Optimized DOM Output, which can make a huge difference.
Honestly, your final score often hinges on how ruthless you are about cutting down third-party scripts and whether you're building on a feather-light theme. It's a challenge, for sure, but with a methodical strategy, it's completely within reach.
What Is the Best Caching Plugin for Elementor?
If you're looking for the best all-arounder that balances power with simplicity, WP Rocket is the community favorite for a reason. It just works. It bundles page caching, file optimization (minification, concatenation), and lazy loading into one user-friendly package that plays incredibly well with Elementor right out of the box.
However, there's a big "if." If your site is hosted on a LiteSpeed server, the free LiteSpeed Cache plugin is an absolute beast. It leverages server-level caching that other plugins just can't compete with. For LiteSpeed users, it's a no-brainer.
The most important thing here is to pick one great caching plugin and learn how to configure it properly. Don't fall into the trap of installing multiple optimization tools. It almost always creates script conflicts and ends up making your site slower—the exact opposite of what you want.
How Badly Do Third-Party Addons Hurt Performance?
The impact of third-party Elementor addons is all over the map. A well-coded, modular addon pack—like our own Exclusive Addons—is built to only load the assets for the specific widgets you're using on a given page. That kind of smart design has a minimal performance footprint.
On the flip side, you have the bloated addon packs. These are the ones that load their entire CSS and JavaScript library on every single page load, whether you use one of their widgets or not. These are the plugins that give addons a bad reputation and can absolutely tank your site's speed.
My advice? Be picky and strategic.
- Audit your addons: Don't be a plugin hoarder. If you don't truly need it, deactivate and delete it.
- Choose modular options: Look for addons that are built with performance in mind and only load what's necessary.
- Use an asset manager: Tools like Perfmatters or Asset CleanUp give you the ultimate control. They let you see every script loading on a page and disable the ones you don't need, which is perfect for trimming the fat from heavy-handed addons.
Is Elementor Pro Faster or Slower Than the Free Version?
This is a classic misconception. Elementor Pro, by itself, doesn't make your site faster or slower. The performance impact comes from how you use its features, not from simply having the Pro license active.
If you go wild with Elementor Pro and cram your pages with complex animated headlines, tons of motion effects, and huge sliders, then yes, those pages will be heavier and slower. More features mean more code to load.
But you can also use Pro to boost your performance. For instance, by using the Pro form builder, you can ditch a separate, heavy contact form plugin. If you use Pro's popup builder, you can get rid of another plugin. By consolidating features and replacing several individual plugins, you can actually make your site faster by reducing the total plugin overhead.
It’s all about being a smart builder, not just about which version you have installed.
Ready to expand your design toolkit without slowing your site down? Exclusive Addons offers over 108 powerful widgets and extensions for Elementor, all built with performance as a top priority. We load assets only when you need them, giving you incredible creative freedom and a blazing-fast user experience. Explore Exclusive Addons today!